Caramel Brownie Cheesecake Bliss
- Time: Active 25 minutes, Passive 55 minutes, Total 1 hour 20 mins
- Flavor/Texture Hook: Fudgy brownie base meeting a silky cheesecake swirl with sticky caramel
- Perfect for: Weekend hosting, birthday celebrations, or when you need a serious chocolate fix
- The Secret Behind why we Indulge in Caramel Brownie Cheesecake Bliss
- Key Timing and Texture Targets for the Ultimate Bake
- The Essential Pantry Items for Your Decadent Creation
- Tools Required for a Smooth and Velvety Finish
- Step by Step Guide to Crafting This Layered Masterpiece
- Common Pitfalls and How to Save Your Dessert
- Personalizing Your Bake with Smart Swaps and Flavor Twists
- Keeping Your Treats Fresh with Smart Storage Methods
- Myths About Cheesecake Brownies
- Matching Your Dessert with The Right Drink and Side
- Recipe FAQs
- 📝 Recipe Card
The Secret Behind why we Indulge in Caramel Brownie Cheesecake Bliss
Picture this: I'm standing in my kitchen, and the air is heavy with the scent of melting butter and that sharp, heady punch of Dutch processed cocoa. It is that specific moment before the sugar hits the pan when the kitchen smells like a professional chocolate shop.
I used to think you had to choose between a brownie and a cheesecake, but after one late night experiment where I swirled leftover caramel into a half baked brownie tray, I realized the two are actually soulmates.
The magic happens when that dark, slightly bitter brownie base anchors the bright, creamy sweetness of the cheese. When you pull this out of the oven, the smell of toasted sugar and vanilla is almost overwhelming in the best way possible.
It is the kind of dessert that makes your neighbors suddenly find a reason to knock on your door. Trust me, we are making something special here that goes way beyond a box mix.
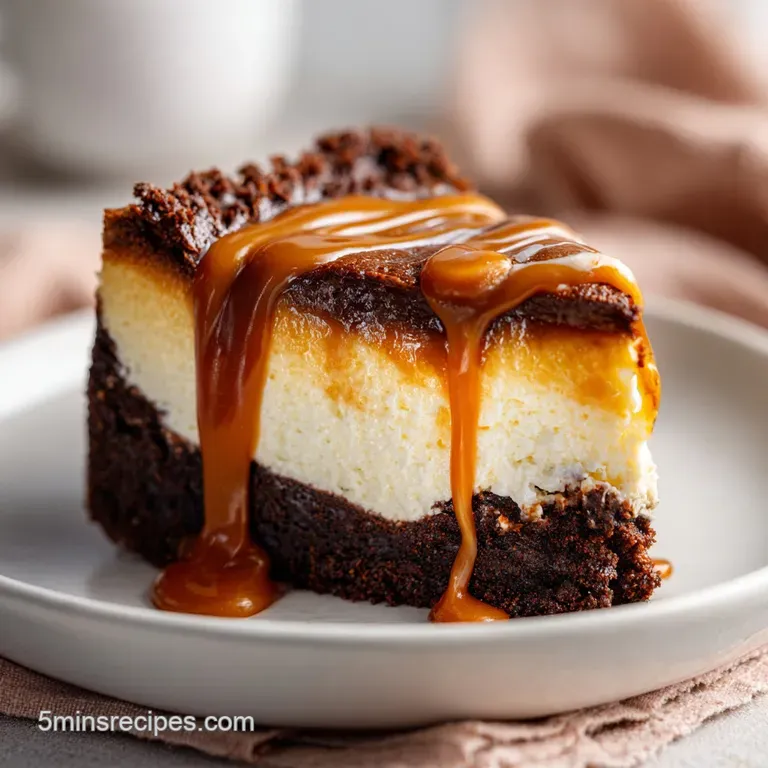
We aren't just making bars; we are creating layers of texture. You get the slight "shatter" of the brownie top where it meets the edges, the velvety smooth center of the cheesecake, and the tacky, salt kissed pull of the caramel sauce.
It is a decadent project, but since we are using simple steps, it is actually quite hard to mess up if you follow the temperature cues.
Key Timing and Texture Targets for the Ultimate Bake
Before we get the whisks out, let's look at the roadmap. This dish relies on getting the brownie base set enough to support the cheesecake without becoming a dry brick. If you are a fan of another decadent treat, you might find this as satisfying as my Fudgy Football Brownie recipe.
The Physics of the Fudgy Foundation: Using melted butter instead of creamed butter prevents excess air from entering the brownie base, ensuring it stays dense and moist under the weight of the cheesecake.
The sour cream in the top layer provides enough acidity to weaken the egg proteins, resulting in a silkier, less "rubbery" cheesecake texture.
| Bake Stage | Oven Temp | Time | Visual Cue |
|---|---|---|---|
| Brownie Base | 180°C | 15 minutes | Edges are set, center still wobbles slightly |
| Full Assembly | 180°C | 35-40 minutes | Cheesecake edges slightly puffed, center jiggles like Jell O |
| Cooling | Room Temp | 1 hours | Surface stops steaming and looks matte |
It is vital to let the cheesecake cool slowly. If you rush it into the fridge, the sudden temperature drop causes the proteins to contract too fast, which is how you end up with those unsightly cracks across the top. Patience is the most important ingredient here.
The Essential Pantry Items for Your Decadent Creation
We are using high fat ingredients because this isn't the place to skimp. low-fat cream cheese has too much water and will turn your brownie base into mush. Stick to the brick style stuff for that iconic Cheesecake Bliss texture.
Component Analysis
| Ingredient | Science Role | Pro Secret |
|---|---|---|
| Dutch Cocoa | Provides deep color and lower acidity | Sift it first to avoid tiny "cocoa bombs" of dry powder |
| Full fat Cream Cheese | Structural fat and creamy mouthfeel | Must be room temp to prevent "lumpy" batter syndrome |
| Salted Caramel | Adds complex sugar notes and salt contrast | Warm it for 10 seconds to make swirling effortless |
| Large Eggs | Bind the fats and liquids into a solid | Room temp eggs emulsify better with the fats |
Ingredient Science Table
| Original Ingredient | Substitute | Why It Works |
|---|---|---|
| 115g Unsalted Butter | 115g Salted Butter | Just omit the extra 1/4 tsp salt. Note: Adds a savory depth |
| 35g Dutch Cocoa | 35g Natural Cocoa | More acidic. Note: Result will be lighter in color and slightly tangier |
| 60g Sour Cream | 60g Greek Yogurt | Similar fat/acid profile. Note: Result is slightly firmer |
| 150g Caramel Sauce | 150g Dulce de Leche | Thicker consistency. Note: Use for more distinct "pockets" of caramel |
Chef's Tip: To get a truly professional finish, freeze your Milky Way bars for 10 minutes before chopping. This prevents the caramel inside the candy from sticking to your knife and allows for clean, distinct chunks.
Tools Required for a Smooth and Velvety Finish
You don't need a kitchen full of gadgets, but a few specific items make a world of difference. A 20cm (8 inch) square baking pan is the standard here. If you use a 9 inch pan, your layers will be thinner, and you will need to reduce the bake time by about 5 minutes to prevent drying out.
A stand mixer or an electric hand mixer is pretty much non negotiable for the cheesecake layer. You need to beat the cream cheese until it is completely smooth before adding the eggs. If you try to do this by hand, you will likely end up with tiny white lumps of cheese that won't melt away in the oven.
Also, grab some parchment paper. Leaving a "sling" of paper hanging over the sides of the pan allows you to lift the whole block out for clean slicing later.
step-by-step Guide to Crafting This Layered Masterpiece
Let's get into the process. We are going to build this from the bottom up. If you are looking for a lighter start to your day before this heavy dessert, try a Daniel Fast Meal recipe for a balanced weekend.
1. Construct the Fudgy Base
Preheat your oven to 180°C. Melt 115g unsalted butter and whisk in 200g granulated sugar until combined. Add 1 large egg and 5ml vanilla, whisking until the batter looks glossy. Sift in 35g Dutch processed cocoa, 65g all purpose flour, and 1/4 tsp salt. Fold gently until no dry streaks remain.
Pour into your lined pan and bake for 15 minutes. Note: This par baking prevents the cheesecake from sinking into raw brownie batter.
2. Emulsify the Creamy Filling
While the base bakes, beat 450g softened cream cheese and 100g sugar until silky. Add 60g sour cream and 5ml vanilla. Add 2 eggs one at a time, mixing on the lowest speed just until combined. Note: High speed at this stage incorporates air bubbles that cause the cheesecake to puff and then collapse.
3. The Marbling Technique
Pour the cheesecake mixture over the warm brownie base. Drop spoonfuls of the 150g salted caramel sauce over the top. Use a butter knife to gently swirl the caramel into the cheesecake. Note: Stop before the colors blend completely; you want distinct ribbons for the best look.
4. The Final Bake
Return the pan to the oven for 35-40 minutes. You are looking for the edges to be set and slightly puffed, while the center still has a slight wobble when you gently shake the pan. Note: The cheesecake will continue to firm up as it cools through "carryover cooking."
5. The Topping and Chill
Remove from the oven and immediately sprinkle with 60g chopped Milky Way bars and 1 tsp flaky sea salt. Let it cool at room temperature for at least 1 hour, then refrigerate for a minimum of 4 hours (overnight is better).
Note: Slicing it while warm will result in a messy, gooey pile rather than clean bars.
Common Pitfalls and How to Save Your Dessert
Even the best of us hit a snag sometimes. The most common issue with this recipe is the cheesecake cracking or the brownie being too hard.
Why Your Cheesecake Cracked
Cracks usually happen for two reasons: over beating the eggs or over baking. When you beat air into the eggs, the cheesecake rises like a souffle. When it cools, it shrinks, and the tension causes it to snap. Also, if the oven is too hot, the edges cook and grab the sides of the pan while the middle is still rising.
| Problem | Root Cause | Solution |
|---|---|---|
| Lumpy cheesecake | Cream cheese was too cold | Microwave cheese in 10 sec bursts before mixing |
| Brownie is greasy | Butter and sugar weren't emulsified | Whisk the egg into the butter/sugar mix more vigorously |
| Caramel sank | Caramel was too thin or heavy | Chill the caramel slightly or use a thicker brand next time |
Common Mistakes Checklist
- ✓ Always use room temperature ingredients for the cheesecake layer to ensure a smooth emulsion.
- ✓ Don't over mix the eggs; once the yellow disappears, stop the mixer.
- ✓ Use a "sling" of parchment paper to easily remove the bars from the pan without scratching your bakeware.
- ✓ Let the dessert sit at room temperature for 15 minutes before serving for the best flavor and texture.
Personalizing Your Bake with Smart Swaps and Flavor Twists
If you want to change things up, this recipe is quite flexible. If you are into preserving flavors for later, you might enjoy the process of a Slow Cooker Apple Butter recipe as well.
For a "Coffeehouse Vibe," add 1 tablespoon of espresso powder to the brownie batter. The coffee won't make it taste like java; it just makes the chocolate taste "more" like chocolate. If you want to go gluten-free, substitute the 65g of flour with a 1 to-1 gluten-free baking blend.
Since the flour amount is small, the texture remains almost identical.
To scale this up for a party (32 servings), double all ingredients and use a 9x13 inch (23x33cm) pan. Increase the final bake time to about 45-50 minutes. For a smaller batch, I don't recommend halving it because it is hard to divide the eggs, but you can freeze half of the finished bars!
| Method | Time | Texture | Best For |
|---|---|---|---|
| Standard Bake | 55 mins | Creamy & Fudgy | Every day indulgence |
| Water Bath | 65 mins | Ultra silky | Formal dinner parties |
| Toaster Oven | 45 mins | Crispier edges | Small households |
Keeping Your Treats Fresh with Smart Storage Methods
Storing this Fudgy Football Brownie recipe correctly is the difference between a gourmet treat and a soggy mess.
Storage: These bars must stay in the fridge. Keep them in an airtight container for up to 5 days. The brownie base actually gets fudgier after a day in the cold.
Freezing: This recipe freezes beautifully! Wrap individual squares in plastic wrap, then place them in a freezer bag. They will stay fresh for up to 3 months. To eat, just thaw in the fridge overnight.
Zero Waste Tip: If you have extra brownie crumbs or "ugly" edge pieces, don't toss them. Crumble them over vanilla ice cream or fold them into a milkshake for a "brownie cheesecake" blast. You can also use leftover caramel sauce as a dip for apple slices.
Myths About Cheesecake Brownies
Myth 1: You need a water bath for these. Truth: While a water bath is great for tall New York style cheesecakes, these bars are thin enough that they cook evenly without one. The brownie base acts as a bit of an insulator for the cheese.
Myth 2: You can use "spreadable" cream cheese from a tub. Truth: Tub cream cheese contains more air and water. It will lead to a soft, weeping cheesecake that won't set properly. Always use the foil wrapped blocks.
Matching Your Dessert with The Right Drink and Side
To truly round out the experience, serve these bars with a cold glass of whole milk or a very dark roast coffee. The bitterness of the coffee cuts right through the heavy sugar of the caramel.
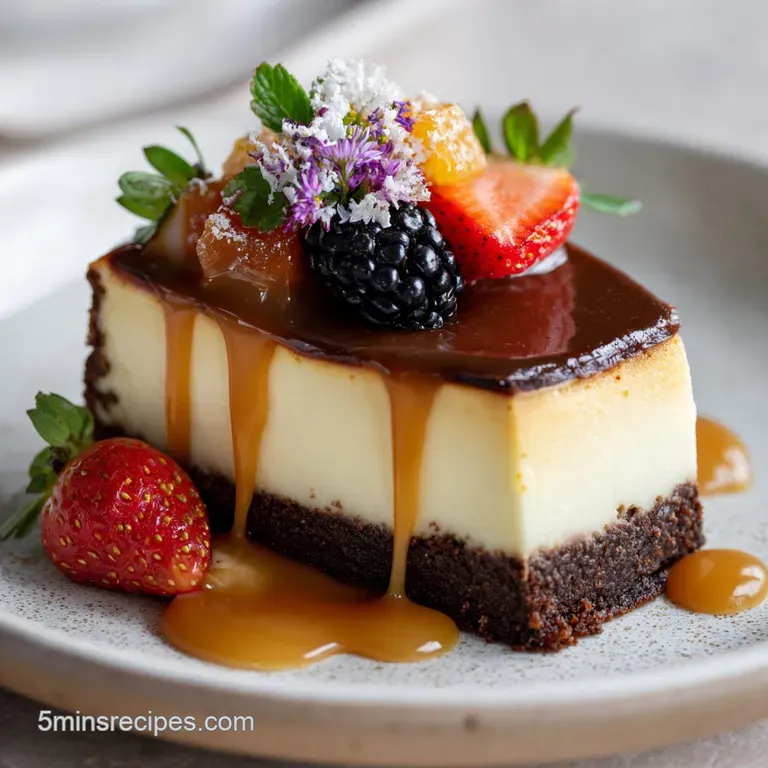
For a restaurant quality presentation, serve a single square in the center of a white plate with a tiny extra drizzle of warmed caramel and a few fresh raspberries on the side. The acidity of the berries provides a much needed break from the richness of the chocolate.
Whatever you do, make sure you share these. They are far too dangerous to keep in the house alone! Enjoy every bite of your Brownie Cheesecake Bliss.

Recipe FAQs
How to ensure the brownie base supports the cheesecake without becoming dry?
Melt butter instead of creaming it. This technique prevents excess air from incorporating, ensuring the brownie stays dense and moist enough to bear the weight of the topping.
Is it true that I must use a water bath when baking these?
No. These bars are thin enough that they bake evenly without the added complexity of a water bath; the brownie layer acts as an insulator.
How can I achieve distinct, non-soggy chunks of Milky Way candy in the topping?
Freeze the candy for ten minutes before chopping. This prevents the internal caramel from sticking to the knife and ensures clean, defined pieces when swirled into the batter.
Why does my cheesecake swirl layer look lumpy after mixing?
Your cream cheese was too cold. Ensure all dairy components for the filling are fully softened to room temperature to achieve a smooth emulsion before adding the eggs.
What is the crucial step to prevent the cheesecake top from cracking during cooling?
Allow the dessert to cool slowly at room temperature first. Rushing it directly to the refrigerator causes rapid protein contraction, leading to unsightly surface cracks.
Can I substitute full fat cream cheese with a tub variety?
No, stick to foil wrapped blocks. Tub cream cheese contains too much water and air, which results in a weeping cheesecake that struggles to set correctly.
How long should I chill the finished bars before attempting to slice them?
Refrigerate for a minimum of four hours. Slicing the bars while still warm or slightly chilled will result in a messy presentation rather than clean, defined squares.
Caramel Brownie Cheesecake Bliss

Ingredients:
Instructions:
Nutrition Facts:
| Calories | 306 calories |
|---|---|
| Protein | 4.1 g |
| Fat | 18.8 g |
| Carbs | 32.4 g |
| Fiber | 0.8 g |
| Sugar | 27.2 g |
| Sodium | 195 mg |
