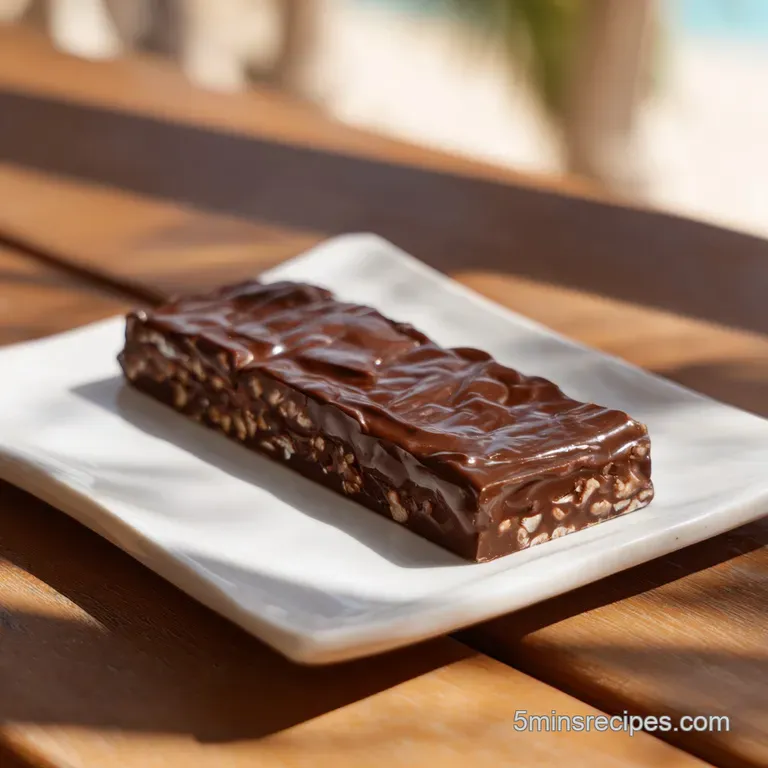
Dubai Chocolate Bar Recipe
- Time: Active 35 minutes, Passive 10 minutes, Total 45 minutes
- Flavor/Texture Hook: Shattering chocolate shell with buttery, toasted kataifi crunch
- Perfect for: Viral food trends, weekend projects, or a show stopping gift
- Guide to the Viral Dubai Chocolate Bar
- The Science of the Snap
- Key Stats for Best Results
- Dubai Chocolate Bar Ingredient List
- Essential Tools for Chocolate Molding
- Detailed Step by Step Assembly
- Fixing Common Textural Issues
- Flavor Variations and Ingredient Swaps
- Storing and Freezing Your Bars
- How to Serve and Enjoy
- Recipe FAQs
- 📝 Recipe Card
Guide to the Viral Dubai Chocolate Bar
The first time I heard that specific crack on a social media video, I knew I was in trouble. You know the one that deep, resonant snap of a thick chocolate shell giving way to a neon green, oozing center of pistachio and toasted pastry. It’s a sensory overload even through a phone screen.
I spent three weeks hunting down kataifi at my local international market just to see if it lived up to the hype.
Honestly, the first batch I made was a bit of a disaster because I rushed the chocolate tempering. It ended up melting in my hands before I could even take a bite, and the filling was way too runny. But after some trial and error, I found the sweet spot.
This recipe is all about that contrast between the smooth, sweet milk chocolate and the earthy, slightly salty pistachio crunch that makes it so addictive.
We've all seen the videos, but making this at home is actually quite a simple sweet treat once you get the rhythm of the layers down. You don't need to be a professional chocolatier to get that high end look; you just need a little patience and some really good ingredients.
Trust me, once you hear that first shatter of the shell you made yourself, you'll never want to go back to store-bought bars.
The Science of the Snap
The Snap Factor: Tempering aligns cocoa butter molecules into stable crystals, which creates that characteristic sharp break and glossy finish on the chocolate.
Maillard Reaction: Frying the kataifi in butter doesn't just make it crispy; it creates new aromatic compounds that provide a deep, toasted flavor.
Viscosity Control: Tahini acts as a stabilizer in the filling, preventing the pistachio butter from becoming too oily while adding a savory depth.
Crunch Comparison: Fresh vs Shortcut
| Method | Texture | Time | Best For |
|---|---|---|---|
| Fresh Kataifi | Ultra fine, shattering | 10 minutes | Authentic viral experience |
| Toasted Phyllo | Flaky, larger shards | 15 minutes | Easy pantry substitution |
| Cornflakes | Harder, jagged crunch | 2 minutes | Maximum time saving |
If you decide to go the cornflake route, just know the texture is much heavier and lacks that delicate, hair like web that makes the Dubai Chocolate Bar so famous. It's a fun twist, but for the real deal, hunt down the kataifi. It’s similar to how we balance textures in our No Bake Chocolate Truffles recipe, where the coating is everything.
Key Stats for Best Results
- Chocolate Thickness: 2mm is the sweet spot thick enough to hold the filling but thin enough to snap.
- Kataifi Color: Aim for a deep golden honey hue, not just pale yellow, for maximum flavor.
- Filling Temperature: Ensure the pistachio mix is room temperature before adding to the chocolate shell to prevent melting.
Dubai Chocolate Bar Ingredient List
- Milk Chocolate (340g): Use a high-quality bar with at least 32% cocoa butter for the best melt. Why this? Provides the classic sweet, creamy base for the bar.
- White Chocolate (55g): This is for the aesthetic "splash" or swirls on the outside of the bar.
- Kataifi (115g): Also known as shredded phyllo dough; it provides the essential crispy texture.
- Unsalted Butter (30g): Used to toast the kataifi until it's perfectly golden and fragrant.
- Pistachio Butter (125g): Look for 100% pistachio paste for the most vibrant green color and intense nuttiness.
- Tahini (15g): Use unsweetened tahini to balance the sweetness with a hint of earthy bitterness. Why this? Prevents the filling from being cloyingly sweet.
- White Chocolate Chips (60g): Melted into the filling to help it set and provide a creamy mouthfeel.
- Flaky Sea Salt (1 pinch): A tiny amount to brighten the pistachio flavor and cut through the richness.
| Ingredient | Science Role | Pro Secret |
|---|---|---|
| Milk Chocolate | Structural Base | Use a bar with cocoa butter, not vegetable fat, for a better melt. |
| Kataifi | Texture Carrier | Chop it into 1cm pieces before toasting for an even, dense crunch. |
| Tahini | Emulsifier | Stir the tahini jar well to incorporate the oils before measuring. |
Selecting the right pistachio butter is the most important step here. Some brands add a lot of sugar or palm oil, which can make your filling feel greasy. I always look for the ones that are just 100% ground nuts. It might be a bit pricier, but the flavor is incomparable, much like the richness you find in a Crock Pot Hot recipe where quality cocoa makes all the difference.
Essential Tools for Chocolate Molding
Having the right tools makes this process way less messy. You'll definitely want a silicone chocolate bar mold; they are flexible and make popping the finished bars out so much easier without breaking them.
A small offset spatula is also a lifesaver for spreading the chocolate thinly and evenly up the sides of the mold.
You will also need a heavy bottomed skillet to toast the kataifi. The dough is very delicate and can go from golden to burnt in a matter of seconds, so even heat distribution is key.
Finally, a digital kitchen scale is much more reliable than measuring cups for this recipe, as the ratio of chocolate to filling needs to be quite precise to ensure the bar seals correctly.
Detailed step-by-step Assembly
Phase 1: The Shell
- Melt white chocolate. Microwave the 55g of white chocolate in 15 second bursts until silky.
- Create the pattern. Drizzle the white chocolate into the bottom of the molds in a zig zag or splash pattern. Note: Let this set in the fridge for 2 minutes before adding the next layer.
- Temper milk chocolate. Melt two thirds of the 340g milk chocolate over a double boiler until it reaches 45°C.
- Cool and seed. Remove from heat and stir in the remaining third of the chocolate until the temperature drops to 30°C.
- Coat the molds. Pour the milk chocolate into the molds, swirling to cover the bottom and sides completely. Cook 5 mins in the fridge until the shell is firm and matte.
Phase 2: The Filling
- Chop the pastry. Take the 115g of kataifi and finely chop it into small pieces.
- Toast for flavor. Melt the 30g of butter in a pan and add the kataifi. Cook 8 mins until deep golden and crackling.
- Mix the green paste. In a bowl, combine the toasted kataifi, 125g pistachio butter, 15g tahini, and 60g melted white chocolate chips.
- Season the mix. Fold in a pinch of flaky sea salt. Note: The mixture should look like thick, green wet sand.
Phase 3: The Seal
- Fill the bars. Spoon the pistachio mixture into the chocolate lined molds, leaving a 2mm gap at the top.
- Final chocolate layer. Pour the remaining tempered milk chocolate over the filling, spreading it to the edges.
- Set and release. Chill for at least 30 minutes. Remove from mold once the bar feels cold and rigid.
Chef's Tip: If your kitchen is very warm, put your silicone mold on a small baking sheet before you start. It makes moving the liquid chocolate to the fridge much safer!
Fixing Common Textural Issues
Why Your Chocolate Is Soft
If your bar starts melting the second you touch it, the chocolate likely wasn't tempered correctly. When chocolate is simply melted and cooled, the fat crystals don't bond tightly, resulting in a soft texture and a dull finish. Always use the seeding method mentioned in the steps to ensure a stable, shiny result.
Why Your Filling Is Runny
Sometimes pistachio butter can be naturally very oily. If your filling seems more like a liquid than a paste, add an extra tablespoon of toasted kataifi or a few more melted white chocolate chips. The white chocolate chips act as a binder when they cool, helping the interior hold its shape when you cut into the bar.
| Problem | Root Cause | Solution |
|---|---|---|
| Dull/Grey Streaks | Out of temper | Re melt and follow seeding temperatures carefully. |
| Kataifi is chewy | Not toasted enough | Ensure it reaches a dark golden brown in the butter. |
| Shell is too thick | Excess chocolate | Turn the mold upside down to let extra chocolate drip out. |
Quick Texture Fixes
| Problem | Cause | Fix |
|---|---|---|
| Sticky Shell | High Humidity | Chill for an extra 20 minutes and handle with gloves. |
| Oily Surface | Separated nut butter | Mix the filling more vigorously before adding to the shell. |
| Broken Bars | Thin corners | Apply a second thin coat of chocolate to the corners of the mold. |
Common Mistakes Checklist
- ✓ Never let a single drop of water touch your chocolate (it will seize and turn grainy).
- ✓ Don't walk away from the kataifi while toasting; it burns in the blink of an eye.
- ✓ Ensure the first chocolate layer is completely set before adding the filling.
- ✓ Tap the mold firmly on the counter after filling to remove air bubbles.
- ✓ Use a clean, dry spatula for every step to avoid cross contaminating the colors.
Flavor Variations and Ingredient Swaps
If you want to try something different, you can easily swap the nut butter. Almond butter or even a high-quality hazelnut spread works beautifully here. Just keep in mind that hazelnut spreads are often much sweeter than pure pistachio paste, so you might want to skip the extra white chocolate chips in the filling to keep it balanced.
For a fun visual twist, you can add a dusting of edible gold luster powder to the mold before the chocolate. It gives the bar an incredibly luxurious look that fits the "Dubai" theme perfectly. You could even top it with some crushed dried raspberries like we do in the Fudgy Football Brownie recipe for a tart contrast.
| Original Ingredient | Substitute | Why It Works |
|---|---|---|
| Milk Chocolate | Dark Chocolate (60%) | Less sweet, provides a more "grown up" flavor profile. |
| Pistachio Butter | Cashew Butter | Creamy and mild. Note: Lacks the iconic green color. |
| Kataifi | Panko Breadcrumbs | Provides crunch. Note: Lacks the buttery, nutty aroma of pastry. |
Decision Shortcut
- If you want a Deep Nutty Flavor, use 100% pistachio paste and dark chocolate.
- If you want a Classic Sweet Treat, stick to milk chocolate and added white chocolate chips.
- If you want a Savory Twist, double the tahini and add a pinch of smoked sea salt.
Storing and Freezing Your Bars
This bar is best enjoyed within a week of making it to ensure the kataifi stays at peak crunch. Store it in an airtight container in a cool, dark place. If your kitchen is warm, the fridge is fine, but let the bar sit at room temperature for 5 minutes before eating so the chocolate can soften slightly for a better mouthfeel.
You can freeze these bars for up to 2 months! Wrap them tightly in plastic wrap and then place them in a freezer bag. When you're ready to eat, thaw them in the fridge overnight. Avoid thawing at room temperature directly from the freezer, as this can cause condensation to form on the chocolate, making it sticky and ruining that beautiful gloss.
To minimize waste, any leftover toasted kataifi can be stored in a jar for weeks. It’s a fantastic topping for yogurt, ice cream, or even a simple pudding. If you have leftover chocolate, pour it onto a piece of parchment paper, let it set, and save it for your next baking project.
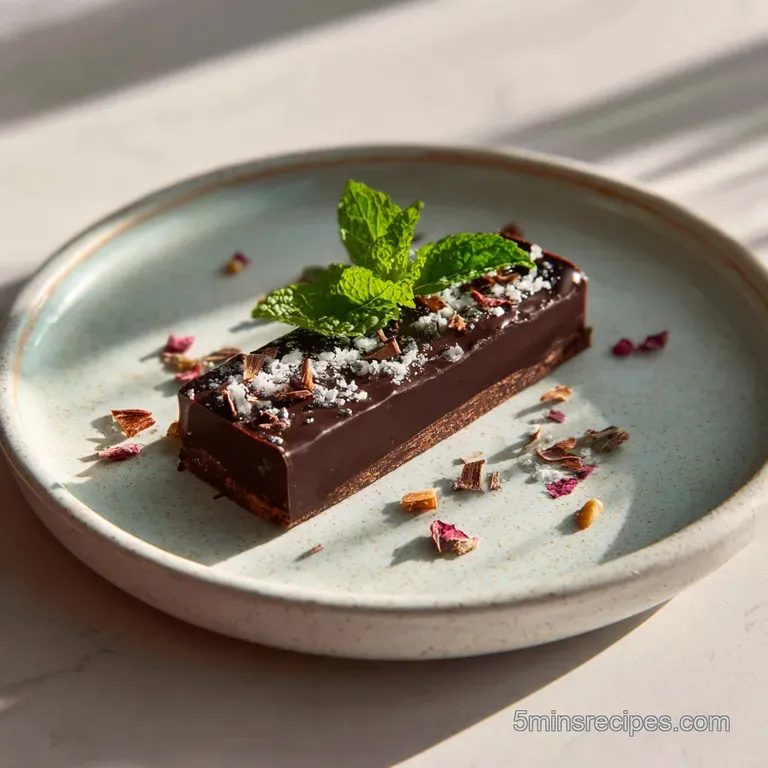
How to Serve and Enjoy
Presentation is half the fun with this recipe. I love to cut the bar into thick fingers using a warm, sharp knife. To do this, run your knife under hot water, wipe it completely dry, and then press firmly through the bar.
This helps melt through the shell without shattering it into a million pieces, giving you those clean, Instagram worthy layers.
These bars are incredibly rich, so a little goes a long way. I usually serve them alongside a strong cup of Turkish coffee or a bitter espresso to balance the sweetness of the milk chocolate. They also make a fantastic gift just wrap them in some gold foil or greaseproof paper and tie them with a simple string.
Everyone will think you spent a fortune at a high end boutique!
If you're serving a crowd, try making mini versions using a silicone ice cube tray. They become perfect little bite sized nuggets of crunch that disappear in seconds. No matter how you serve it, the star is always that contrast between the smooth chocolate and the buttery, toasted interior. Enjoy every single crackle!

Recipe FAQs
What are the ingredients in Dubai chocolate?
The main components are milk chocolate, pistachio butter, tahini, and toasted kataifi (shredded phyllo dough). The richness comes from combining these elements into a smooth shell and a crunchy, savory filling. For a similar flavor balancing act, see how we use acid in our Bisquick Waffle Recipe to cut through sweetness.
What does Dubai chocolate have on it?
The iconic look is created using a decorative drizzle of tempered white chocolate on top of the milk chocolate shell. This white chocolate is often applied before the bar is fully set to create aesthetic swirls or splashes. If you are interested in using white chocolate purely for decoration, check out the dipping techniques in our Chocolate Covered Strawberries recipe.
How do I achieve the signature "snap" when biting the bar?
Temper the milk chocolate correctly to ensure the cocoa butter molecules form stable crystals. Untempered chocolate will remain soft and melt easily, failing to produce that sharp, resonant crackle. Mastering stable crystal structures is crucial; if you enjoyed learning that control here, see how the same principle of ingredient alignment applies to achieving perfect structure in our No Bake Energy Bites recipe.
Can I substitute the kataifi dough for something easier to find?
Yes, you can substitute it, but the texture will change significantly. Panko breadcrumbs or crushed cornflakes offer crunch but lack the delicate, hair like structure that gives the original bar its unique mouthfeel.
For the most authentic result, seek out kataifi, as it toasts beautifully when fried in butter.
Is it true the filling should be savory to balance the chocolate?
Yes, this savory balance is key to the bar's addictive quality. The addition of tahini and flaky sea salt directly contrasts the sweetness of the milk chocolate. Without this earthy, slightly bitter note, the bar can taste overly sweet and one-dimensional.
How long should the chocolate shell chill before adding the filling?
Chill the initial shell layer in the refrigerator for about 5 minutes until it is firm and matte to the touch. This ensures the cold, firm base doesn't melt when the room temperature filling is added.
If your filling is too warm, it will ruin your shell; ensure your technique for temperature control is solid before starting.
What is the best way to get the finished bar out of the mold without breaking it?
Remove the bar from the mold using slow, steady pressure, ideally after chilling for at least 30 minutes. If it resists, gently flex the silicone mold around the edges first before pressing up from the bottom.
For a clean look, you can run the back of a knife under hot water, wipe it dry, and use it to cut the bar into clean pieces.
Easy Dubai Chocolate Bar

Ingredients:
Instructions:
Nutrition Facts:
| Calories | 1910 kcal |
|---|---|
| Protein | 30 g |
| Fat | 113 g |
| Carbs | 196 g |
| Fiber | 8 g |
| Sugar | 128 g |
| Sodium | 185 mg |
