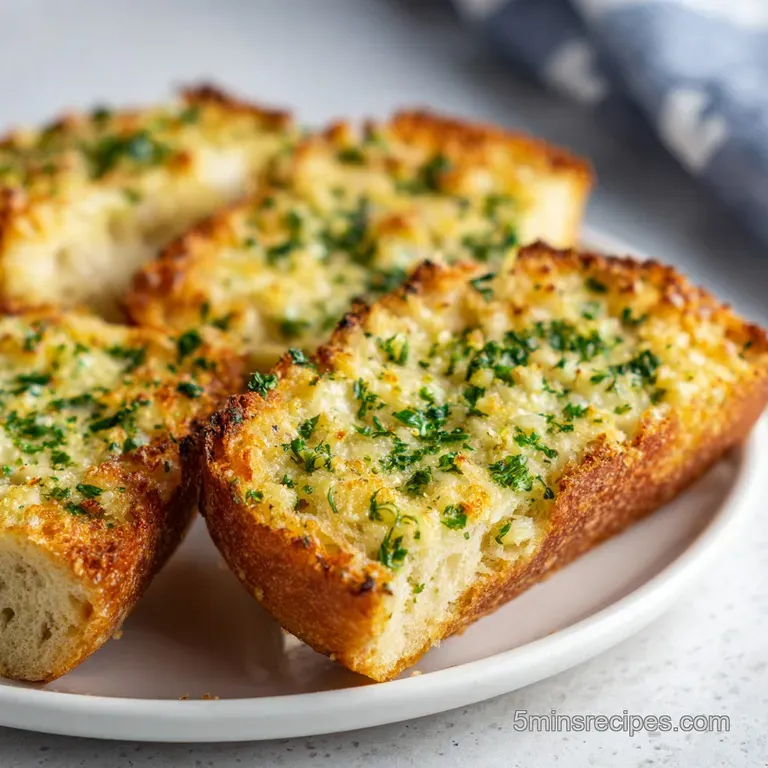
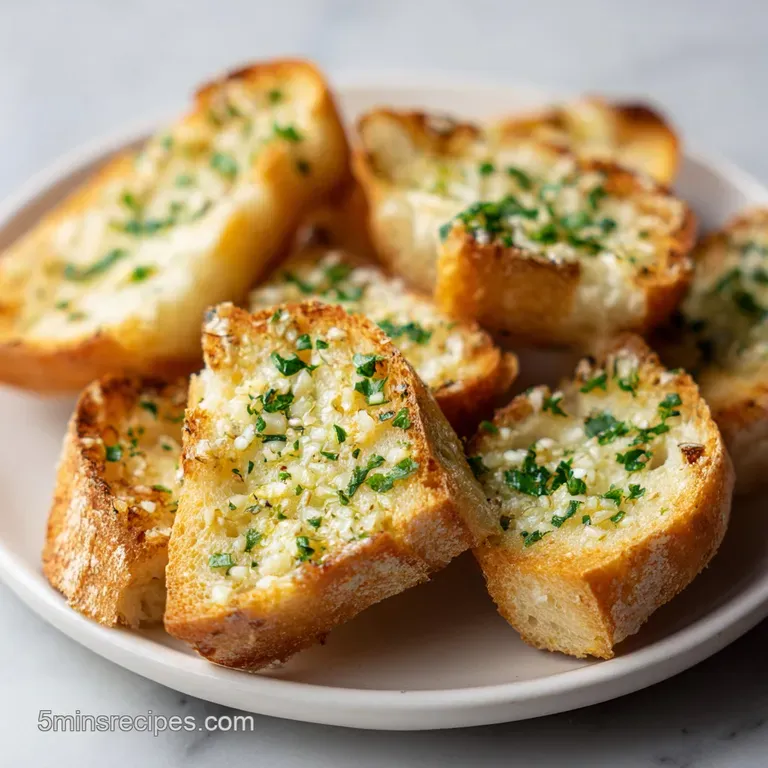
Garlic Bread: Crispy and Buttery
- Time: Active 5 minutes, Passive 10 minutes, Total 15 minutes
- Flavor/Texture Hook: Shattering golden crust with a velvety, herb infused center
- Perfect for: Quick weeknight dinners, spaghetti nights, or beginner meal prep
- Why Fresh Garlic is the Secret Hero of This Recipe
- How the Fats and Aromatics Create a Crisp Result
- Deep Dive Into Our Primary Flavor Components
- The Essential Components for a Shattering Golden Crust
- The Minimal Tool Kit for Maximum Garlic Results
- The Step-by-Step Guide to a Flawless Garlic Infusion
- How to Stop Your Garlic Bread From Getting Soggy
- Scaling the Recipe for Large Crowds or Small Snacks
- Flavor Variations for Your Cheese Garlic Bread Recipe
- Smart Ways to Store and Reheat Your Leftover Loaves
- The Best Dishes to Serve With Your Homemade Loaf
- Recipe FAQs
- 📝 Recipe Card
Why Fresh Garlic is the Secret Hero of This Recipe
The second that tray hits the 400°F (200°C) oven, your entire house starts smelling like a high end Italian trattoria. It’s that sharp, pungent aroma of fresh garlic hitting bubbling butter that signals dinner is actually happening.
I used to be the person who reached for the jar of pre minced garlic or the shaker of garlic salt, but honestly, those are pale imitations. Fresh cloves are the real heavy lifters here because they contain all those volatile oils that provide a "zing" you just can't replicate.
When you use fresh garlic, you’re getting a complex flavor profile that moves from sharp and spicy when raw to sweet and nutty as it roasts for 10 minutes. This recipe is all about respecting that one ingredient.
We use five cloves because we want that bold, unmistakable presence, but we balance it with a little garlic powder to fill in the flavor gaps. It’s a professional speed trick that ensures every single bite has a deep, underlying savory note without requiring you to peel twenty cloves.
We aren't just making toast; we’re creating a layered experience. The bread acts as the canvas, the butter provides the richness, and the Parmesan brings that salty, umami finish that makes it impossible to stop at one slice.
If you’ve ever had garlic bread that was either too soggy or so dry it scratched the roof of your mouth, we’re fixing that today. It's about that 15 minutes total time no more, no less to hit that sweet spot of a "shattering" crust and a soft, buttery middle.
How the Fats and Aromatics Create a Crisp Result
- Fat Emulsification: Mashing the softened butter with the garlic and herbs creates a stable paste that sits on top of the bread fibers rather than immediately soaking through, preventing a soggy center.
- Starch Gelatinization: High heat at 400°F (200°C) quickly dehydrates the surface of the French loaf, turning the starches into a crispy, structural lattice.
- Aromatic Infusion: The heat of the oven draws the essential oils out of the minced garlic and parsley, distributing them into the melting butter so the flavor penetrates the first few millimeters of the bread crumb.
- Protein Browning: The addition of Parmesan cheese provides milk solids and proteins that brown faster than the bread alone, creating those coveted dark, salty spots of flavor.
| Method | Time | Texture | Best For |
|---|---|---|---|
| Standard Oven | 10 minutes | Evenly crisp, soft center | Large family dinners |
| Air Fryer | 6 minutes | Ultra crunchy, very fast | Quick solo snacks |
| Broiler Only | 3 minutes | Charred edges, soft base | Last minute side dish |
The choice of method depends entirely on your texture preference, but the oven provides the most consistent results for a full 16 oz loaf. Using a parchment lined sheet is a chef secret for easy cleanup and ensuring the bottom of the bread doesn't scorch from direct metal contact.
Deep Dive Into Our Primary Flavor Components
| Ingredient | Science Role | Pro Secret |
|---|---|---|
| Unsalted Butter | Moisture barrier and flavor carrier | Use room temp butter to ensure it mashes into a smooth, spreadable emulsion. |
| Fresh Garlic | Provides sulfur compounds for "bite" | Mince it finely to avoid large, bitter chunks of half cooked garlic. |
| Parmesan Cheese | Adds umami and structural crunch | Grate it yourself from a block; pre shredded has anti caking agents that hinder melting. |
The butter is the most critical element here because it acts as the vehicle for every other flavor. If you use cold butter, you'll end up with clumps that don't distribute the garlic evenly.
By ensuring it is softened, you can whip the garlic powder, salt, and pepper into it, creating a "compound butter" that acts as a professional grade spread.
The Essential Components for a Shattering Golden Crust
To get that authentic taste, we need to be specific about our choices. This isn't just about what's in the pantry; it's about how those items work together to create the best garlic bread recipe you've made from scratch.
- 16 oz French or Italian bread loaf: Look for something with a relatively thin crust and a wide, airy crumb. Why this? It absorbs the butter deeply without becoming a heavy, dense brick.
- Substitute: A large sourdough loaf (adds a tangy fermented note).
- 0.5 cup unsalted butter, softened: This is our fat base. Why this? Unsalted allows us to control the seasoning precisely with sea salt.
- Substitute: high-quality margarine (will be saltier and have a lower melting point).
- 5 cloves fresh garlic, minced: The soul of the dish. Why this? Provides the sharp, spicy aromatic punch only fresh cloves can offer.
- Substitute: 2.5 tsp jarred minced garlic (milder, slightly more acidic flavor).
- 0.5 tsp garlic powder: Our secret depth builder. Why this? Distributes a consistent "cooked" garlic flavor throughout the entire spread.
- Substitute: Onion powder (changes the profile to a savory herb bread).
- 0.5 tsp sea salt: Enhances the butter and garlic. Why this? Large grains provide small bursts of seasoning rather than a flat saltiness.
- Substitute: Kosher salt (use slightly more as grains are larger).
- 0.25 tsp freshly cracked black pepper: For a subtle back end heat. Why this? Freshly cracked has more floral notes than pre ground pepper.
- Substitute: White pepper (for a cleaner look and a more earthy heat).
- 2 tbsp fresh Italian parsley, chopped: For color and brightness. Why this? Cuts through the richness of the butter with a fresh, grassy finish.
- Substitute: Dried parsley (use only 2 tsp, as it is more concentrated).
- 0.5 cup freshly grated Parmesan cheese: The umami topper. Why this? Creates a lacy, crispy crust when exposed to the 400°F (200°C) heat.
- Substitute: Pecorino Romano (much saltier and sharper).
The Minimal Tool Kit for Maximum Garlic Results
You don't need a high end kitchen to pull this off. In fact, a minimalist approach usually leads to better results because you aren't over complicating the process. All you really need is a reliable serrated knife the kind with the little teeth.
If you try to use a smooth chef's knife on a soft loaf of French bread, you'll just squish it into a pancake. A serrated knife "saws" through the crust perfectly, keeping that beautiful airy structure intact.
Aside from the knife, a standard baking sheet and a piece of parchment paper are your best friends. The parchment isn't just for cleanup; it creates a tiny buffer of air that helps the bottom of the loaf crisp up without burning.
For the butter mixture, a simple fork and a small bowl are actually better than a food processor. Mashing by hand allows you to keep some texture in the garlic, which makes for a much more interesting bite.
Chef's Note: If you have a garlic press, use it. It breaks the cell walls of the garlic more aggressively than a knife, releasing more of the allicin the compound responsible for that iconic "garlicky" kick.
The step-by-step Guide to a Flawless Garlic Infusion
- Preheat your oven to 400°F (200°C). Note: A hot oven is non negotiable for a "shattering" crust.
- Use a serrated knife to slice the 16 oz bread loaf in half lengthwise. until you have two long, open faced halves.
- In a small mixing bowl, combine 0.5 cup softened unsalted butter, 5 cloves minced garlic, 0.5 tsp garlic powder, 0.5 tsp sea salt, 0.25 tsp black pepper, and 2 tbsp parsley.
- Mash the mixture with a fork until an emulsion is formed and it looks like a creamy pale green paste.
- Slather the compound butter mixture generously over the cut sides of the bread. Note: Make sure to get all the way to the very edges to avoid dry corners.
- Top the buttered surfaces evenly with 0.5 cup freshly grated Parmesan cheese.
- Place the bread halves cut side up on a parchment lined baking sheet.
- Bake for 10 minutes until the cheese is bubbling and the edges are golden brown and shattering.
- Remove from the oven and let it sit for 2 minutes before slicing into 2 inch wide pieces. until the butter sets slightly into the crumb.
How to Stop Your Garlic Bread From Getting Soggy
The biggest tragedy in the kitchen is pulling out a loaf of bread that is dripping with grease in the middle but dry on the outside. This usually happens when the butter is melted before it's applied, or if the oven isn't hot enough.
We want the butter to melt into the bread as it bakes, not sit on top of it like a puddle. If you’re worried about the texture, remember that the "shatter" comes from the high heat of 400°F (200°C) dehydrating the outer layer quickly.
Why Your Bread Is Soft or Greasy
If your loaf comes out floppy, it’s almost always a temperature issue. If the oven isn't preheated fully, the butter melts slowly and soaks all the way through the bread before the crust has a chance to crisp up. Another culprit is using too much butter I know, it sounds impossible, but there is a limit!
Stick to the 0.5 cup for a standard 16 oz loaf to keep the proportions right.
| Problem | Root Cause | Solution |
|---|---|---|
| Soggy Center | Oven temp too low or butter was melted before spreading | Ensure a full preheat to 400°F and use softened (not melted) butter. |
| Bitter Taste | Garlic was burnt or too old | Mince garlic fresh and keep an eye on the bread during the final 2 minutes. |
| Hard/Dry Crust | Bread was stale or overbaked | Wrap the bottom in foil leaving the top exposed to keep it soft. |
For those who want a truly professional result, think about the pairing. This bread is a classic side, but it’s actually the star when served next to a Panera Tomato Soup. The acidity of the soup cuts right through that rich, garlic butter emulsion.
Common Mistakes Checklist
- ✓ Never use cold butter; it will tear the bread and leave uneven clumps of garlic.
- ✓ Don't skip the garlic powder; it provides the base layer flavor that fresh garlic can't achieve alone.
- ✓ Avoid pre minced garlic in a jar; the preservative liquid adds an "off" acidic taste to the butter.
- ✓ Resist the urge to broil from the start; you'll burn the garlic before the bread is warmed through.
- ✓ Use a serrated knife for slicing; a dull blade will crush the airy interior of your French loaf.
Scaling the Recipe for Large Crowds or Small Snacks
When you're cooking for a big family gathering, it’s easy to just double everything, but be careful with the aromatics. Garlic flavor can become exponentially stronger when doubled.
If you’re making two loaves (32 oz of bread), I suggest using 8 cloves of garlic instead of 10, as the intensity can overwhelm the palate. For the liquids and fats, a straight double usually works fine.
If you’re scaling down for a solo dinner, don't try to use a quarter of a loaf. Instead, make the full batch of compound butter, spread it on the whole loaf, and freeze the other half before baking. This is a massive time saver for busy weeknights.
You can just pop a frozen, pre buttered half into the oven whenever the craving hits, adding only 3-5 minutes to the total bake time.
| Servings | Bread Amount | Butter Amount | Garlic Cloves |
|---|---|---|---|
| 2 People | 4 oz (quarter loaf) | 2 tbsp | 1-2 cloves |
| 5 People | 8 oz (half loaf) | 4 tbsp | 2-3 cloves |
| 10 People | 16 oz (full loaf) | 8 tbsp (0.5 cup) | 5 cloves |
| 20 People | 32 oz (two loaves) | 16 tbsp (1 cup) | 8-9 cloves |
Scaling up baking projects usually requires lower temperatures, but since garlic bread is relatively thin, you can keep the 400°F (200°C) setting. Just ensure your oven has enough airflow don't crowd the racks or the bread will steam instead of crisping.
Flavor Variations for Your Cheese Garlic Bread Recipe
Once you have the base down, you can start playing with the profile. A popular twist is the "Umami Bomb," where you mix 1 tsp of miso paste into the butter. It sounds wild, but the fermented soy adds a depth that makes people wonder what your "secret ingredient" is. If you're looking for something more substantial, you can turn this into a meal by adding thin slices of steak on top, similar to the flavors in Garlic Butter Steak Bites.
The Herb Heavy Variation
If parsley feels a bit basic, try a blend of fresh basil, oregano, and thyme. This gives the bread a more "pizza parlor" vibe. Just remember the ratio: if using fresh herbs, you need about three times the volume of what you'd use for dried.
Fresh herbs should be added to the butter at the very end to keep their color vibrant.
The Spicy Kick
For those who like heat, adding a teaspoon of red pepper flakes or a smear of Calabrian chili paste to the butter mixture changes the game. The fat in the butter carries the capsaicin across your tongue, making the heat feel "rounder" and less sharp. It pairs beautifully with a cold salad or a creamy pasta dish.
Smart Ways to Store and Reheat Your Leftover Loaves
Let's be real leftover garlic bread is a rare occurrence. But if you do have a few slices left, do not I repeat, do not put them in the microwave. The microwave turns the bread into a gummy, chewy mess that eventually hardens into a rock.
Instead, wrap the leftovers in aluminum foil and toss them back into a 350°F (180°C) oven for about 5 minutes. This gently re melts the butter and crisps the crust without drying out the center.
For long term storage, the freezer is your best friend. You can freeze the baked slices in a heavy duty freezer bag for up to 3 months. To reheat from frozen, just put the slices directly on a baking sheet at 350°F (180°C) for about 8-10 minutes.
It’ll taste almost exactly like it did the day you made it.
Zero Waste Tip: If the bread has gone truly stale and you can't save the texture, don't throw it out! Cut the garlic bread into 1 inch cubes and bake them at 300°F (150°C) for 15 minutes.
You’ve just made the best garlic butter croutons for your next Caesar salad. You can also pulse the stale bread in a blender to make "garlic breadcrumbs" which are incredible for topping mac and cheese or breading chicken.
The Best Dishes to Serve With Your Homemade Loaf
Garlic bread is the ultimate "bridge" food it connects the main dish to the side dishes. Traditionally, it’s served with pasta, but it’s also the perfect tool for mopping up extra sauce from a bowl of mussels or a hearty beef stew.
The crunch of the 16 oz French loaf provides a necessary textural contrast to softer meals.
- Classic Pasta: Anything with a red sauce (marinara, bolognese) or a creamy alfredo.
- Roast Chicken: The garlic in the bread complements the savory juices of the poultry.
- Big Green Salads: Use the bread as a savory "crouton" on the side of a crisp romaine salad with lemon vinaigrette.
Debunking Garlic Bread Myths
One common myth is that you need to wrap the bread in foil while baking to keep it soft. While this works for "pull apart" styles, for a standard open faced loaf, foil actually traps steam and prevents the Maillard reaction from creating that golden crust.
If you want a soft loaf, just bake it for a minute or two less; don't smother it in foil.
Another misconception is that more garlic is always better. There is a point of diminishing returns where the raw garlic becomes too acidic and actually burns the back of your throat. Five cloves for a 16 oz loaf is the "sweet spot" for high impact flavor without the "garlic breath" that lasts for three days.
Trust the ratio it’s been tested in my kitchen more times than I can count!
Right then, you've got the secrets, the science, and the steps. This homemade garlic bread is going to ruin the frozen stuff for you forever, but that's a risk we're willing to take. Let's crack on and get that oven preheated!

Recipe FAQs
What is the trick to garlic bread?
Use room temperature, softened butter. Cold butter tears the bread loaf and prevents an even distribution of the garlic, which is the same principle of fat-handling we use when making Cowboy Butter.
What temperature do you bake garlic bread at?
Bake at 400°F (200°C). This high heat ensures the crust becomes golden and shattering while the center stays perfectly warm within 10 minutes.
What makes garlic bread taste better?
Combine fresh garlic with garlic powder. Fresh minced cloves provide aromatic punch, while the powder ensures a consistent base layer of savory flavor throughout every bite.
Is it better to use garlic salt or garlic powder for garlic bread?
Always use garlic powder. Using garlic salt can easily lead to an overly salty final product since sea salt is already a measured component of the compound butter mixture.
Is it true I should broil the bread for a crispier top?
No, this is a common misconception. Broiling from the start often burns the delicate minced garlic before the bread is warmed through, resulting in a bitter, charred flavor.
How to slice the bread properly?
Use a serrated knife for all slicing. A serrated blade saws through the crust cleanly, whereas a standard knife will crush the airy interior of your French or Italian loaf.
How to achieve the best garlic butter texture?
Mash the butter and seasonings with a fork until an emulsion is formed. Whisking or mashing until the components are fully unified ensures the garlic and herbs stay suspended in the butter rather than separating during the bake.
Homemade Garlic Bread
Ingredients:
Instructions:
Nutrition Facts:
| Calories | 227 kcal |
|---|---|
| Protein | 6.0 g |
| Fat | 11.6 g |
| Carbs | 24.8 g |
| Fiber | 1.2 g |
| Sugar | 1.4 g |
| Sodium | 412 mg |
