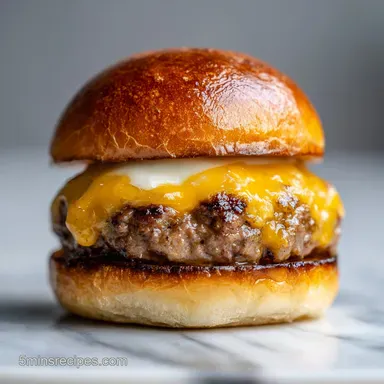
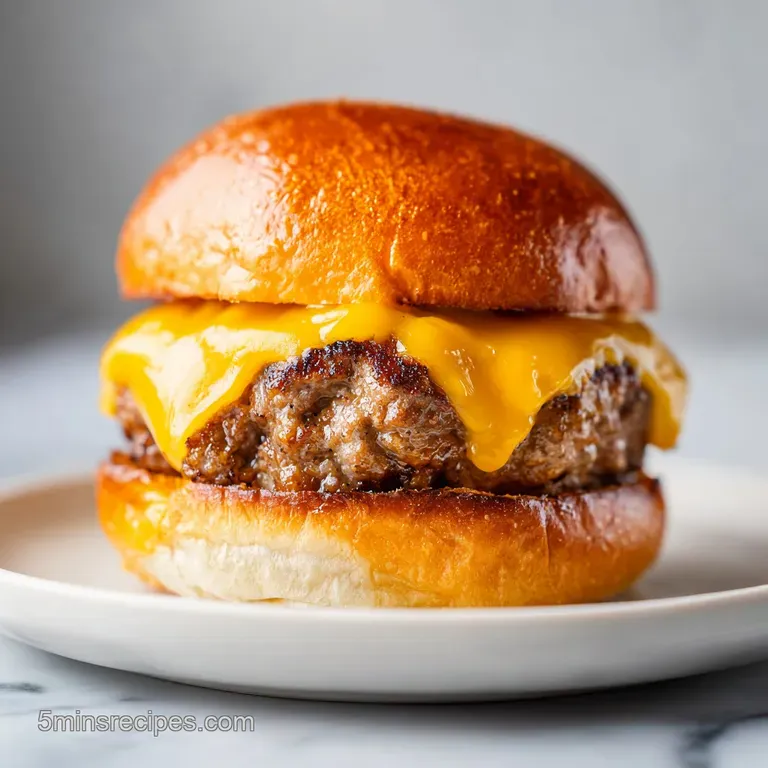
Burger Recipe with Cheese: Failure-Proof
- Time: 15 min prep + 10 min cook = Total 25 mins
- Flavor/Texture Hook: Mahogany crust with a velvety, melted cheese finish
- Perfect for: Quick weeknight dinners or a high speed weekend grill session
- The Best Burger Recipe with Cheese
- What Makes This Work
- The Beef Breakdown
- The Building Blocks
- Essential Kitchen Gear
- Step-by-Step Cooking Guide
- Avoiding Common Burger Fails
- Swaps and New Twists
- Adjusting the Batch Size
- Truths About Beef
- Storage and Scrap Tips
- Perfect Sides and Pairings
- High in Sodium
- Recipe FAQs
- 📝 Recipe Card
The first thing you'll notice is that aggressive sizzle the second the meat hits the cast iron. It's that specific sound, followed by the aroma of browning beef and toasted brioche, that tells you everything is going right.
There is nothing quite like the smell of melted cheddar hitting a hot pan, filling the kitchen with a rich, salty scent that makes everyone in the house suddenly very hungry.
I remember a time when I thought "leaner is better" for burgers. I bought 90/10 beef, pressed the patties down with a heavy spatula to get them "flat," and ended up with something resembling a dry, grey hockey puck. It was a disaster.
I realized then that the secret isn't in the effort you put into shaping them, but in the fat content and the patience to let a crust form without touching the meat.
Once I switched to 80/20 chuck and stopped messing with the patties, everything changed. This Burger Recipe with Cheese is the result of those lessons. It's about speed, heat, and letting the ingredients do the heavy lifting.
You're going to get a burger that's juicy on the inside and has a shatter crisp exterior, all in about 25 minutes.
The Best Burger Recipe with Cheese
Right then, let's get into how to actually pull this off. The goal here is a professional grade result in record time. We aren't doing anything fancy like stuffing the meat with herbs or mixing in fillers, because when you have high-quality beef and a good slice of cheese, you don't need to hide the flavor.
The beauty of this approach is the plan. We prep the sauce and toppings first, shape the meat gently, and then hit the heat. By the time the beef is resting, the buns are toasted and the assembly is a breeze. It's a streamlined flow that keeps the kitchen from becoming a chaotic mess.
But before we jump into the pans, we need to talk about why this specific method works. Most people treat a burger like a steak, but a burger is its own beast. It needs more heat and less fuss.
What Makes This Work
- The Fat Ratio: Using 80/20 beef ensures there is enough rendered fat to baste the meat from the inside, which prevents it from drying out during the over high heat sear.
- The Thumb Print: Pressing a small divot into the center prevents the burger from doming up into a ball, ensuring the patty stays flat and cooks evenly.
- The Steam Trap: Adding a splash of water and a lid at the end creates a mini steam sauna that melts the cheese instantly without overcooking the beef.
- The Bun Toast: Using the leftover beef fat in the pan to toast the brioche adds a layer of savory depth that butter alone can't match.
Before you decide on your ingredients, you might be wondering if you can just use a store-bought patty. While it's faster, there is a massive difference in the final result.
| Feature | Fresh Hand Formed | store-bought Frozen | Impact on Result |
|---|---|---|---|
| Texture | Loose, tender crumb | Dense, rubbery | Fresh is far juicier |
| Seasoning | Surface level crust | Mixed in salt | Fresh has better crust |
| Shrinkage | Minimal (if indented) | Significant | Fresh holds its shape |
The key to a great result is understanding how the components interact. It's not just about the meat, but how the fat and the heat play together.
The Beef Breakdown
| Ingredient | Science Role | Pro Secret |
|---|---|---|
| 80/20 Ground Beef | Primary flavor & moisture | Keep it cold until the second it hits the pan |
| Kosher Salt | Moisture draw & crust | Only salt the outside, never mix it into the meat |
| Brioche Buns | Structural support | Toast the interior faces to prevent sauce sogginess |
| Sharp Cheddar | Flavor punch & melt | Use a thick slice for a "velvety" drape |
When you're looking at your meat, remember that salt is a powerful tool. If you mix salt into the ground beef, it begins to dissolve the proteins, turning your burger into something with the texture of a sausage. By salting only the surface, you create a concentrated brine that helps form that mahogany crust.
For more on how protein structures react to heat, Serious Eats has some great deep dives into the physics of searing. Trust me on this, keeping the salt on the outside is the single biggest upgrade you can make to your burger game.
The Building Blocks
Here is everything you'll need. Make sure your beef is cold when you start shaping it so the fat doesn't melt from the heat of your hands.
- 2 lbs ground beef (80/20 chuck blend) Why this? High fat content equals maximum juiciness
- 1 tsp kosher salt Why this? Coarser grains are easier to distribute evenly
- 1 tsp freshly cracked black pepper Why this? Fresh pepper has a sharper, brighter bite
- 1 tbsp neutral oil (like canola or vegetable) Why this? High smoke point prevents burning
- 6 slices sharp cheddar or American cheese Why this? These melt the most consistently
- 6 brioche buns, split Why this? Buttery sweetness balances the salty beef
- 3 large leaves of Romaine lettuce, torn Why this? Provides a crisp, fresh crunch
- 1 large tomato, sliced thin Why this? Adds acidity and moisture
- 1 small red onion, thinly sliced Why this? Sharp contrast to the rich meat
- 1/2 cup mayonnaise Why this? Creamy base for the signature sauce
- 1 tbsp yellow mustard Why this? Tangy zip to cut through the fat
- 1 tbsp pickle relish Why this? Adds sweetness and texture
- 1/2 tsp paprika Why this? Adds a subtle smokiness and color
If you're missing something, don't panic. Most of these can be swapped without ruining the meal.
| Original Ingredient | Substitute | Why It Works |
|---|---|---|
| Brioche Buns | Potato Buns | Similar soft texture, slightly less sweet |
| Sharp Cheddar | Pepper Jack | Adds a spicy kick while still melting well |
| Romaine Lettuce | Iceberg | Even crunchier, though less nutrient dense |
| Neutral Oil | Ghee | Higher smoke point and adds a nutty flavor |
Now that we've got our gear and ingredients ready, let's move into the actual execution.
Essential Kitchen Gear
You can use a grill, but for this specific Burger Recipe with Cheese, a cast iron skillet is the gold standard. It holds heat better than any other pan, which is what gives you that incredible sear.
If you don't have one, a heavy stainless steel pan will work, but you'll need to be a bit more careful with your heat management.
You'll also want a sturdy spatula - the kind with a thin edge that can slide under the patty without tearing the crust. A meat thermometer is non negotiable if you want consistent results. Guessing the doneness of a burger is a gamble I stopped taking years ago.
Finally, have a small bowl for your sauce and a plate for your assembled toppings. Having everything "mise en place" (everything in its place) is the difference between a relaxed dinner and a frantic scramble.
Step-by-step Cooking Guide
Let's crack on. Follow these steps exactly for the best result.
- Shape the beef. Gently divide the ground beef into 6 equal portions. Lightly shape them into disks about 3/4 inch thick. Note: Do not overwork the meat or it will become tough.
- Create the indent. Press a small indentation into the center of each patty with your thumb. Note: This prevents the burger from puffing up into a ball.
- Season the meat. Sprinkle the kosher salt and black pepper generously on both sides immediately before cooking. Note: Salting too early draws out moisture and ruins the sear.
- Heat the pan. Add 1 tbsp neutral oil to a cast iron skillet over medium high heat until the oil is shimmering.
- Sear the patties. Place the patties in the pan. Cook 3-4 mins until a deep brown crust forms. Do not move or press them.
- Flip and finish. Flip once and cook for another 3 mins, or until the internal temperature reaches 155°F (68°C) for medium.
- Steam melt the cheese. During the final 60 seconds, place a slice of cheese on each patty. Pour 1 tsp of water into the pan and cover immediately with a lid until the cheese is velvety and melted.
- Toast the buns. Remove the burgers. Place the split brioche buns in the residual beef fat in the skillet and toast until golden brown.
- Whisk the sauce. In a small bowl, mix mayonnaise, yellow mustard, pickle relish, and paprika until smooth.
- Assemble. Slather the bottom bun with sauce, add Romaine, the cheesy patty, tomato, red onion, and the top bun.
Chef's Note: If you're cooking for a crowd, work in batches. Overcrowding the pan drops the temperature, and instead of searing, your burgers will steam and turn grey. It's better to have two batches of perfect burgers than one batch of mediocre ones.
Avoiding Common Burger Fails

The most common mistake I see is people treating their burgers like pancakes. They press down on the meat with a spatula to "help it cook." Stop doing that! Every time you press, you're squeezing out the fat that makes the burger juicy. You're essentially draining the flavor directly into the pan.
Another issue is the "cold center." This happens when the heat is too high, searing the outside but leaving the inside raw. Using a thermometer takes the guesswork out of this. For a medium burger, you're looking for that 155°F mark.
Why Your Burger Shrank
If your patties look like small meatballs by the time they hit the plate, you probably didn't make the thumb indent. Meat fibers contract when heated. By creating a dip in the middle, you give the meat room to expand inward rather than upward.
Fixing the Dry Patty
Dryness usually comes from two things: using meat that is too lean (like 90/10) or overcooking. If you find your burgers are consistently dry, check your meat blend and pull them off the heat 5 degrees earlier than you think.
The Cheese Won't Melt
If your cheese is just sitting there looking sad, you need the steam trick. That teaspoon of water creates a burst of vapor that traps heat and forces the cheese to melt in seconds.
| Problem | Root Cause | Solution |
|---|---|---|
| Patty is rubbery | Overworked the meat | Shape gently, don't knead |
| Buns are soggy | Sauce applied too early | Toast buns first, assemble fast |
| Meat is grey | Pan wasn't hot enough | Wait for oil to shimmer |
Common Mistakes Checklist:
- ✓ No mixing salt into the meat before shaping.
- ✓ Thumb indentation added to every patty.
- ✓ Meat stayed cold until the moment of searing.
- ✓ No pressing the patties with a spatula.
- ✓ Internal temperature verified with a thermometer.
Swaps and New Twists
This Burger Recipe with Cheese is a classic, but you can easily pivot it depending on your mood. If you want something with a bit more "smoke," try adding a slice of smoked provolone instead of cheddar. It gives you that BBQ vibe without needing a grill.
For those who want a "molten center," you can take a small cube of cold butter or a piece of mozzarella, wrap the beef around it, and then shape the patty. When it hits the heat, the center turns into a liquid gold surprise.
If you're looking for something completely different but with similar flavors, you might enjoy a Bisquick cheeseburger pie, which is a great way to get those same tastes in a one pot meal.
For a Smokehouse Twist
Add a slice of crispy bacon and replace the yellow mustard in the sauce with a teaspoon of liquid smoke or a dash of Worcestershire sauce.
For a Lighter Option
Swap the brioche buns for large lettuce wraps. You'll lose the toasted sweetness, but you'll keep the juicy beef and melted cheese.
For a dairy-free Alternative
Use a cashew based cheddar alternative. Note: These often require slightly more steam/water to melt compared to dairy cheese.
If you have extra cheese on hand and want a side dish that complements this meal, my homemade cheese crackers are a brilliant pairing for the salty, savory profile of a cheeseburger.
Adjusting the Batch Size
Scaling this recipe is pretty straightforward, but there are a few rules to keep the quality high.
Scaling Down (for 2-3 people): Use 1 lb of beef instead of 2 lbs. You can use a smaller skillet, and the cook times remain the same. Just be careful not to let the sauce sit too long, as the small amount of mayo can separate.
Scaling Up (for 12+ people): If you're doubling the recipe, do not double the salt and pepper exactly. Go to about 1.5x the seasoning; otherwise, it can become overly salty. Work in batches of 6. If you try to cram 12 patties into one pan, you'll lose the sear and end up with steamed meat.
If you're baking the buns in the oven instead of the skillet to save time, lower the temp to 325°F (160°C) and toast for about 5-7 minutes. This prevents the sugar in the brioche from burning before the inside is warm.
Truths About Beef
There are a lot of "rules" floating around the internet that are actually just myths. Let's clear a few up.
Myth: Searing "locks in" the juices. This is simply not true. Searing creates a crust that tastes incredible because of the browning of proteins, but it doesn't create a waterproof seal. Juices escape regardless of the sear.
The reason seared burgers taste juicier is because of the flavor intensity of the crust.
Myth: You should press the burger to remove grease. As mentioned before, this is the fastest way to ruin a burger. The grease is where the flavor and moisture live. If you have too much fat in the pan, carefully pour some out or use a paper towel to dab the edges, but leave the meat alone.
Myth: High end Wagyu is always better. Not for a burger. Wagyu can actually be too fatty for a standard cheeseburger, making it feel greasy rather than juicy. An 80/20 chuck blend is the industry standard for a reason - it's the perfect balance.
Storage and Scrap Tips
If you have leftovers, store the patties and the buns separately. Put the cheesy patties in an airtight container in the fridge for up to 3 days. When reheating, avoid the microwave if possible. Instead, put the patty back in a skillet over medium heat with a tiny splash of water and a lid.
This restores the moisture and melts the cheese again without making the meat rubbery.
For freezing, you can freeze the raw patties. Place parchment paper between each disk so they don't stick together, then vacuum seal or wrap them tightly in foil. They'll stay fresh for up to 3 months. Thaw them in the fridge overnight before cooking.
- Onion Scraps
- Save your red onion peels and ends in a freezer bag. When the bag is full, simmer them with carrot peels and celery to make a quick vegetable stock.
- Beef Fat
- If you have a lot of residual fat in the pan, don't pour it down the drain. Pour it into a glass jar and keep it in the fridge. Use it later to sauté potatoes or sear a steak for an incredible flavor boost.
- Tomato Stems
- Blend the remaining bits of your tomato with a bit of garlic and oil to make a quick bruschetta topping.
Perfect Sides and Pairings
A burger this rich needs something to cut through the fat. A classic side of salty fries is great, but a crisp slaw or a vinegary cucumber salad provides a necessary acidic contrast that cleanses the palate between bites.
If you're feeling fancy, try some grilled corn on the cob with lime and chili powder. The sweetness of the corn and the zing of the lime balance the heavy, savory notes of the Burger Recipe with Cheese perfectly.
For drinks, a cold ginger ale or a crisp lemonade works wonders. The carbonation and acidity help break down the richness of the beef and cheese, making every bite feel as fresh as the first one. Trust me, don't skip the acidic side - it's what makes the whole meal feel balanced rather than just heavy.
High in Sodium
980 mg 980 mg of sodium per serving (43% 43% of daily value)
The American Heart Association recommends a daily limit of 2,300 mg of sodium for most adults to maintain heart health.
Tips to Reduce Sodium
-
Reduce Added Salt-25%
Cut the kosher salt in half or omit it entirely, as the cheese and condiments already provide significant saltiness.
-
Swap the Relish-20%
Replace store-bought pickle relish with freshly diced cucumbers and a squeeze of lemon juice for a similar crunch without the brine.
-
Choose Lower Sodium Cheese-15%
Substitute American cheese for a Swiss cheese or a low-sodium sharp cheddar to reduce processed salt intake.
-
Enhance with Aromatics
Increase the paprika or add garlic powder and onion powder to boost flavor profiles without adding any sodium.
Recipe FAQs
Is there really a 5 6 7 rule for making burgers?
No, this is a common misconception. There is no universal "5 6 7 rule" for burger success; focus instead on keeping patties 3/4 inch thick and reaching an internal temperature of 155°F.
Can diabetics eat beef burgers?
Yes, but monitor the bun. The ground beef and cheese are low-carb, but the brioche buns contain sugars and flour that can impact blood glucose levels.
What is the best cheese to put on burgers?
Sharp cheddar or American. These provide the ideal combination of bold flavor and a smooth melt that clings to the meat.
How to mix cheese into burgers?
Gently fold cheese cubes into the beef. Do this immediately before shaping the disks to avoid overworking the meat, which keeps the texture tender.
Why did my burger puff up in the middle?
You likely skipped the center indentation. Pressing a small dimple into each patty with your thumb prevents the meat from curling into a ball during searing.
How to reheat leftover cheeseburgers without them getting rubbery?
Heat in a skillet over medium heat. Add a tiny splash of water and cover with a lid to steam the patty and remelt the cheese without overcooking the beef.
Can I use a different meat blend for these patties?
Stick with 80/20 ground chuck. This specific fat ratio ensures the burger stays juicy, similar to the richness found in our breakfast sausage patties.
Burger Recipe With Cheese Failure Proof