Homemade Chili: Velvety and Flavorful
- Time: Active 20 minutes, Passive 1 hours, Total 1 hours 20 mins
- Flavor/Texture Hook: Smoky, earthy, and exceptionally velvety
- Perfect for: High speed weeknight dinners and game day crowds
- Crafting the Ultimate Bold Homemade Chili
- Speed Meets Depth: Recipe Specs
- Flavor Foundations: Component Analysis
- Essential Tools for Perfect Results
- Executing the Perfect Chili Simmer
- Fixing Common Textural Mistakes Fast
- Smart Swaps for Budget Cooking
- Adjusting Batch Sizes for Crowds
- Debunking Chili Preparation Myths
- Preserving Your Batch for Later
- Serving Suggestions for Maximum Impact
- Recipe FAQs
- 📝 Recipe Card
Crafting the Ultimate Bold Homemade Chili
Imagine the kitchen on a gray, rain slicked Tuesday. The air is heavy, but the moment the lean ground beef hits the hot Dutch oven, the room shifts. There is that unmistakable sizzle the sound of moisture evaporating and the Maillard reaction beginning its work.
As you stir in the diced yellow onions and red peppers, the sharp, bright aroma of softening aromatics starts to cut through the heavy air, signaling that something substantial is on the way.
I used to think that a great Homemade Chili required an eight hour commitment. I was wrong. After years of testing techniques in a high pressure home kitchen, I learned that the secret isn't just time; it is the sequence.
By treating spices like a chef treats fine seasonings toasting them in the fat rather than boiling them in the liquid we unlock a level of richness that usually takes all day to develop. This is the version I make when I want professional results but only have an hour before the family starts hovering by the stove.
Speed Meets Depth: Recipe Specs
The Fat Soluble Flavor Extraction
Lipid Blooming: Most compounds in chili powder and cumin are fat soluble, meaning they only release their full aromatic potential when toasted in oil or rendered beef fat for 60-90 seconds.
This process transforms raw, gritty spices into a rounded, integrated flavor profile that permeates the entire pot.
| Batch Consistency | Internal Temperature | Resting Time | Visual Cue |
|---|---|---|---|
| Standard Batch | 165°F | 10 minutes | Oil slightly separates at edges |
| Double Batch | 165°F | 15 minutes | Thickens significantly during rest |
| Half Batch | 160°F (Carryover to 165) | 5 minutes | Uniform deep mahogany color |
Working at professional speed means knowing when the dish has crossed the finish line. The resting period is not just a suggestion; it is the final step where the starches from the beans and the gelatin from the bone broth settle into a cohesive, velvety sauce. If you are looking for a different profile later this week, my White Bean Turkey recipe offers a lighter alternative using similar fast cooking principles.
Flavor Foundations: Component Analysis
The difference between a flat, one dimensional bowl and a chef quality result lies in the chemistry of your pantry. We are looking for high impact ingredients that provide "cheats" for long simmered taste.
| Ingredient | Science Role | Pro Secret |
|---|---|---|
| 2 lbs Lean Ground Beef | Protein structure | Brown it in two batches to ensure a hard sear rather than steaming. |
| 1 tsp Cocoa Powder | Tannin Depth | The bitterness of unsweetened cocoa mimics the complexity of long aged peppers. |
| 2 tbsp Tomato Paste | Umami Foundation | Caramelize the paste until it turns brick red to double the savory notes. |
| 1.5 cups Bone Broth | Collagen/Body | Provides a silky mouthfeel that plain water or standard stock cannot match. |
While we are using a stovetop method for maximum control, you can see how these same flavor profiles translate to other formats, such as a Wendys Chili Recipe which utilizes a slower approach for that specific fast food nostalgia.
Essential Tools for Perfect Results
To execute this Homemade Chili with precision, you need equipment that manages heat effectively. A heavy bottomed Dutch oven (like a Lodge or Le Creuset) is non negotiable here. The thick walls prevent hot spots that can scorch the tomato paste and beans during the hour long simmer.
You want a vessel that holds heat steadily, allowing the bubbles to rise slowly and consistently.
You will also want a sturdy wooden spoon or a flat edged spatula. This is essential for "deglazing"-scraping up those browned bits of beef and caramelized onion from the bottom of the pot.
Those bits are concentrated flavor, and if they stay stuck, they might burn; if they are scraped up, they become the soul of your sauce. A sharp chef's knife is your final requirement, ensuring the onion and red pepper are diced finely enough to melt into the base without leaving chunky, undercooked pieces.
Executing the Perfect Chili Simmer
- Brown the beef. Add the 2 lbs lean ground beef to the Dutch oven over medium high heat. Note: Work in two batches if needed to avoid overcrowding the pan.
- Sauté the aromatics. Once the beef is browned, toss in the finely diced yellow onion and red bell pepper. Cook for 5 minutes until the onions are translucent and slightly golden.
- Incorporate garlic. Add the 3 cloves of minced garlic and cook for exactly 60 seconds until the fragrance fills the kitchen.
- Caramelize the paste. Clear a small space in the center and add the 2 tbsp tomato paste. Stir it against the bottom of the pot for 2 minutes until it turns a dark rust color.
- Bloom the seasonings. Stir in the chili powder, cumin, smoked paprika, cocoa powder, oregano, and cayenne pepper. Coat the meat and vegetables until the mixture looks dark and smells intensely earthy.
- Deglaze the pot. Pour in the 1.5 cups of beef bone broth. Use your spoon to scrape every browned bit off the bottom until the liquid is smooth and dark.
- Add the tomatoes. Pour in the canned fire roasted diced tomatoes and the tomato sauce. Stir well to combine the base.
- Add the beans. Fold in the drained and rinsed kidney beans and black beans. Note: Rinsing the beans prevents the metallic tin taste from entering your chili.
- Simmer low. Reduce heat to low, cover partially, and simmer for 1 hours. Stir every 15 minutes until the sauce has thickened and the flavors have melded.
- Season and rest. Add the sea salt and cracked black pepper. Turn off the heat and let the pot sit for 10 minutes until the liquid stops bubbling and the texture becomes velvety.
Fixing Common Textural Mistakes Fast
Even the most experienced cook can hit a snag with liquid ratios or spice levels. The key is to react quickly before the dish finishes simmering.
Thickening a Runny Base
If your chili looks more like a soup than a stew, you likely have too much moisture trapped. This often happens if the vegetables released more water than expected. Simply remove the lid and increase the heat slightly for the final 15 minutes of cooking.
This allows for evaporation while the starches from the beans continue to hydrate and thicken the sauce naturally.
Brightening a Flat Profile
Sometimes a batch tastes "heavy" but lacks excitement. This is usually an acid problem, not a salt problem. A tiny splash of apple cider vinegar or a squeeze of lime right before serving can wake up the earthy spices and make the beef flavor pop.
It cuts through the fat and provides a necessary contrast to the smoky paprika.
| Problem | Root Cause | Solution |
|---|---|---|
| Grained/Gritty Spices | Spices weren't bloomed in fat | Simmer for an extra 15 mins with a splash of broth. |
| Excessive Saltiness | Broth reduction was too aggressive | Add a peeled, halved potato for 10 mins to absorb salt, then discard. |
| Lack of Depth | Tomato paste wasn't caramelized | Stir in a teaspoon of Worcestershire sauce or more cocoa powder. |
Common Mistakes Checklist:
- ✓ Avoid boiling the chili; a gentle, lazy bubble is all you need for tender beans.
- ✓ Never skip rinsing the canned beans, or the excess starch will make the sauce murky.
- ✓ Don't add the salt until the end; as the liquid reduces, the saltiness intensifies.
- ✓ Pat the beef dry with paper towels before browning to get a better crust.
Smart Swaps for Budget Cooking
You don't need the most expensive ingredients to get a five star result. In fact, many budget friendly alternatives offer unique flavor profiles that work just as well in a Homemade Chili.
| Original Ingredient | Substitute | Why It Works |
|---|---|---|
| 2 lbs Ground Beef | Ground Turkey (93/7) | Lean and affordable. Note: Requires extra tsp of oil to prevent sticking. |
| Beef Bone Broth | Beef Bouillon + Water | Much cheaper than bone broth. Provides the necessary salt and beefy base. |
| Fire Roasted Tomatoes | Standard Diced Tomatoes + 1/4 tsp liquid smoke | Mimics the charred flavor of fire roasted cans at a lower price point. |
If you find yourself with leftover chili but not quite enough for a full meal, you can transform it into a crowd pleasing Chili Cheese Dip recipe by folding in some cream cheese and sharp cheddar. It is a brilliant way to stretch your ingredients and ensure zero waste in the kitchen.
Adjusting Batch Sizes for Crowds
Scaling a chili recipe is relatively straightforward because it is a "one pot" meal, but you have to be careful with the spices. If you are doubling the recipe to 16 servings, do not simply double the cayenne pepper and salt immediately. Spices can become overwhelming when scaled linearly.
Start with 1.5 times the spices, taste at the 45 minute mark, and then add more if your palate demands it.
For smaller households, halving the recipe is easy. Use a smaller pot to ensure the liquid still covers the beans and meat, otherwise, it will evaporate too quickly and leave you with a dry mess.
If you are halving the recipe and only have one egg for a side of cornbread, beat the egg first and use half, or just use the whole egg for a richer crumb. In the chili itself, use a small can of tomatoes (around 8 oz) to keep the ratios balanced.
Fast Results vs. Classic Method
| Feature | Fast Professional Method | Traditional All Day Method |
|---|---|---|
| Active Time | 20 minutes | 45 minutes |
| Flavor Secret | Spices bloomed in fat | Long term enzymatic breakdown |
| Texture | Velvety and thick | Soft, almost disintegrated |
Debunking Chili Preparation Myths
One persistent myth is that you must brown the meat until it is gray all over. In reality, you want a hard sear on one side to create those crispy, browned bits known as "fond." Constant stirring prevents this.
Let the beef sit undisturbed for 3 minutes before breaking it up; that is where the flavor lives.
Another misconception is that beans "don't belong" in real chili. While certain regional styles (like Texas Red) forbid them, from a home cook's perspective, beans provide essential fiber and help thicken the sauce without needing cornstarch or flour.
They are a practical, budget smart way to add volume and texture to the dish.
Preserving Your Batch for Later
Storage and Reheating
This Homemade Chili is actually better the next day. The flavors continue to meld in the fridge, and the spices mellow out. Store it in an airtight container for up to 4 days. When reheating, do it on the stovetop over low heat.
Add a tablespoon of water or broth to loosen the sauce, as it will have thickened significantly in the cold.
Freezing and Zero Waste
Chili freezes beautifully for up to 3 months. I recommend freezing it in individual portions in freezer safe bags laid flat. This saves space and allows for quick "emergency" lunches. For a zero waste tip, don't throw away the ends of your onions or the ribs of your peppers.
Throw them into a freezer bag to make your own vegetable scrap stock for the next time you need broth.
Serving Suggestions for Maximum Impact
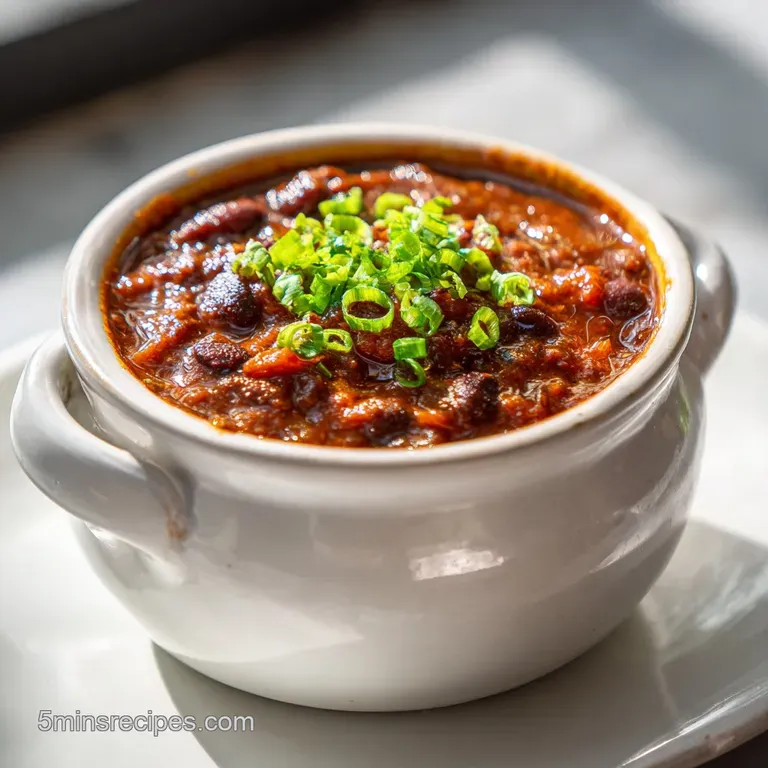
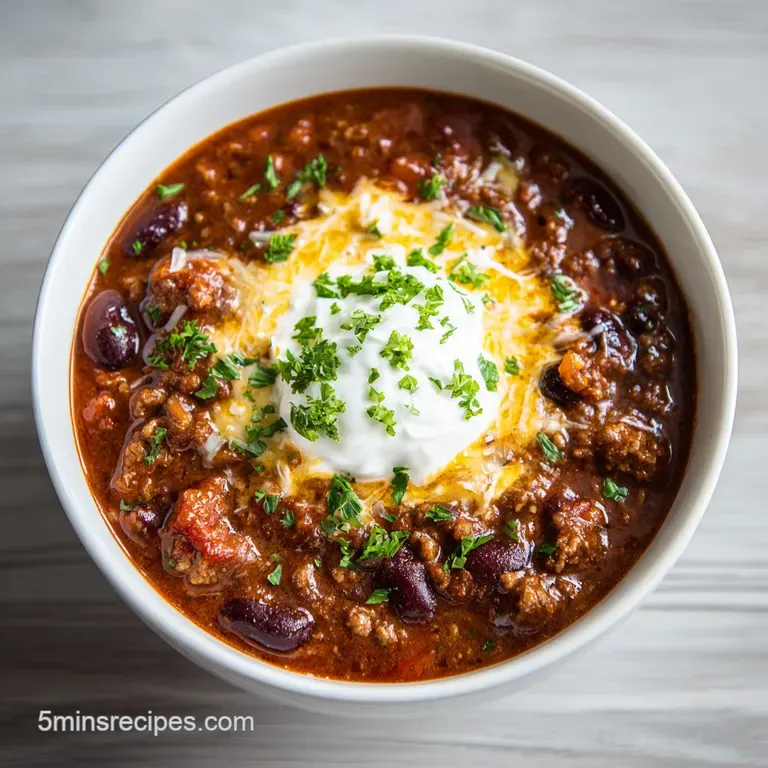
While a bowl of Homemade Chili is a meal on its own, the right toppings can take it from "Tuesday dinner" to "weekend feast." Think about contrasting textures and temperatures. A dollop of cold sour cream against the hot chili, or the crunch of fresh scallions against the soft beans, makes every bite more interesting.
If you want X, do Y: If you want a smoky kick, add a chopped chipotle pepper in adobo sauce. If you want a crunchier topping, use crushed corn chips or toasted pepitas. If you want a creamier finish, stir in a handful of shredded Monterey Jack cheese 5 minutes before serving.
For a complete spread, consider serving this alongside Breakfast Sausage Patties recipe if you are doing a "brunch for dinner" theme, or stick to the classics like honey drizzled cornbread or a crisp green salad to balance the richness of the beef. If you find yourself in the mood for something even silkier next week, our Creamy Tortellini Soup recipe hits those same comfort notes with a different flavor profile. Whatever you choose, remember that the best chili is the one that makes your kitchen smell like home.

Recipe FAQs
What is the secret to really good chili?
Blooming your spices in fat. Most chili flavor compounds are fat soluble, so toasting chili powder, cumin, and paprika in oil or rendered beef fat for 60-90 seconds before adding liquid unlocks deep, complex flavor instantly.
Which beans are best for making chili?
Kidney beans and black beans offer the best balance. Kidney beans hold their shape well during simmering, providing texture, while black beans break down slightly to help thicken the sauce naturally.
What are the essential ingredients for real chili flavor depth?
Unsweetened cocoa powder and caramelized tomato paste are key. Cocoa powder adds a deep, earthy bitterness that mimics long simmered peppers, and caramelizing the tomato paste until it turns brick red maximizes its umami base.
What should I absolutely avoid putting in my homemade chili?
Avoid adding salt too early or skipping the browning step. Adding salt before liquids reduce concentrates it too much, and if you steam the meat instead of searing it, you lose the crucial browned bits (fond) that create savory depth.
How do I fix chili that tastes too watery or thin?
Remove the lid and increase the heat slightly for the final 15 minutes. Allowing gentle evaporation concentrates the starches released by the beans, thickening the base into a velvety sauce without requiring flour.
Is it necessary to simmer chili for hours to achieve good texture?
No, a 60-minute simmer is sufficient if you build your flavor base correctly. Focus on searing the meat hard and blooming the spices thoroughly; this technique provides the rapid flavor development that usually requires all-day cooking, similar to the speed principles in our Korean Beef Bowls recipe.
What is the best way to adjust seasoning if my chili tastes flat?
Add a splash of acid, like apple cider vinegar or lime juice. Flat flavor often indicates a lack of brightness; acid cuts through the fat and smoke, instantly balancing the earthy spices and making the beef flavor pop.
Easy Homemade Chili Recipe

Ingredients:
Instructions:
Nutrition Facts:
| Calories | 341 kcal |
|---|---|
| Protein | 31.4 g |
| Fat | 8.9 g |
| Carbs | 23.8 g |
| Fiber | 4.4 g |
| Sugar | 5.8 g |
| Sodium | 438 mg |
