Sugar-Free 4Th of July Berry Tart: Creamy and No-Bake
- Time:30 mins active + 4 hours chilling
- Flavor/Texture Hook: Velvety filling with a buttery, crumbly base
- Perfect for: Crowd-pleasing summer parties or keto friendly celebrations
- Sugar Free 4th of July Dessert with Fresh Berries
- Why the Texture Stays Firm
- Component Analysis
- Shopping List Breakdown
- Essential Gear for This
- Step by Step Assembly
- Pro Tips and Pitfalls
- Fun Flavor Variations
- Adjusting Your Batch Size
- Debunking Common Myths
- Storage and Waste Tips
- Best Serving Ideas
- Recipe FAQs
- 📝 Recipe Card
Ever wonder why most sugar-free treats have that weird, chemical aftertaste or a texture like cardboard? I used to think it was just the price you paid for skipping the sugar. But then I realized it's usually about the fat to sweetener ratio and the temperature of the ingredients.
When you get the balance right, you don't miss the granules at all.
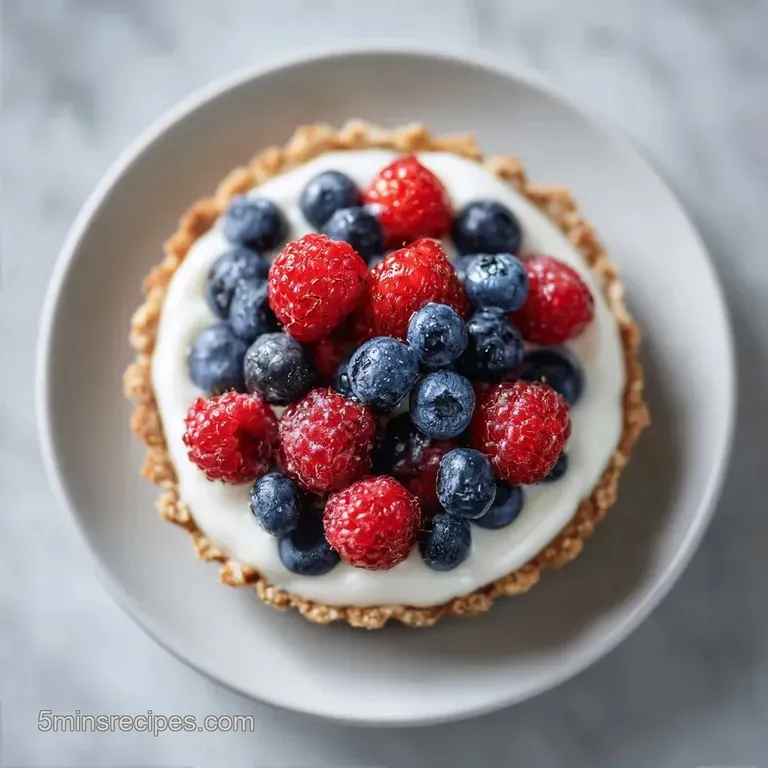
This delicious sugar free 4th of July Dessert with Fresh Berries is the perfect treat for your celebration. It's a no bake beauty that looks like a professional tart but feels like a cheat code in the kitchen.
You get the bright, punchy scent of lemon and the creamy weight of mascarpone style filling without the sugar crash.
We're going for a look that screams Americana deep blues and bright reds against a snowy white background. It's light, it's fresh, and honestly, it's a relief to have something on the table that doesn't make everyone feel sluggish in the July heat.
Sugar free 4th of July Dessert with Fresh Berries
The magic here is in the contrast. You've got the almond crust, which smells like toasted nuts and browned butter, paired with a filling that's essentially a cloud of vanilla and lemon. It doesn't feel like a "diet" dish; it feels like a high end dessert you'd find at a bistro.
Since we aren't using heat to set the structure, we rely on the cold. The heavy cream and cream cheese create a stable matrix that holds the berries in place. It's a simple approach, but the result is a slice that stays clean and sharp when you cut into it, rather than slumping on the plate.
Right then, let's get into how this actually comes together. I've found that the prep is the easy part, but the patience during the chilling phase is where most people trip up. Trust me, don't try to slice this early, or you'll end up with a very tasty soup.
Why the Texture Stays Firm
Since we're skipping the oven, we have to use a few tricks to make sure this doesn't turn into a puddle the moment it hits the picnic table.
- Fat Solidification: The combination of saturated fats from the butter and cream cheese hardens in the fridge, creating a structural wall that supports the fruit.
- Air Incorporation: Whipping the heavy cream introduces tiny air bubbles that provide lift and a velvety mouthfeel, preventing the filling from feeling like a block of cold cheese.
- Almond Flour Density: Unlike wheat flour, almond flour doesn't need gelatinization from heat to feel "done"; the melted butter acts as the glue that binds the nut oils together.
- Chia Gel: A tiny bit of chia seeds mixed with water creates a natural mucilage that coats the berries, stopping them from leaking juice into the white filling.
| Fresh Berries | Shortcut (Frozen/Canned) | Impact | Savings |
|---|---|---|---|
| Vibrant color, snap texture | Dull color, softer bite | High visual loss | Minimal |
| Natural tartness | Syrupy sweetness | Flavor shift | Low |
| Low moisture leak | High bleed/weeping | Filling softens | Medium |
Component Analysis
Understanding what each part does helps you avoid those "why did this happen" moments mid recipe.
| Ingredient | Science Role | Pro Secret |
|---|---|---|
| Almond Flour | Structural Base | Use superfine to avoid a grainy crust |
| Cream Cheese | Body & Tang | Must be room temp to avoid lumps |
| Monk Fruit | Sweetness | Powdered version dissolves instantly |
| Heavy Cream | Aeration | Keep it ice cold for maximum volume |
Shopping List Breakdown
Grab these items from the store. I highly recommend getting the highest fat percentage for the cream and cheese that's where the stability comes from.
- 2 cups (190g) superfine almond flour Why this? Provides a gluten-free, nutty base that sets without baking
- 1/4 cup (55g) melted unsalted butter Why this? Binds the flour and adds a rich, savory note
- 2 tbsp (25g) erythritol or monk fruit sweetener Why this? Adds a hint of sweetness to the crust
- 1/4 tsp (1.5g) salt Why this? Cuts through the richness of the almond and butter
- 16 oz (450g) full fat cream cheese, softened Why this? The primary stabilizer and flavor base
- 1 cup (240ml) heavy whipping cream, ice cold Why this? Creates the light, airy texture
- 1/2 cup (90g) powdered monk fruit sweetener Why this? Powdered prevents a "gritty" feel in the filling
- 1 tsp (5ml) pure vanilla extract Why this? Adds aromatic depth and warmth
- 1 tbsp (15g) lemon juice Why this? Brightens the flavor and cuts the fat
- 1 cup (150g) fresh blueberries Why this? Natural blue hue and pop of juice
- 1 cup (150g) fresh strawberries, sliced Why this? Classic red contrast and sweetness
- 1 tbsp (15ml) water Why this? Activates the chia seeds
- 1 tsp (4g) chia seeds Why this? Creates a clear glaze to prevent berry bleeding
Essential Gear for This
You don't need a professional kitchen, but a few specific tools make the assembly way easier.
- 9 inch tart pan with a removable bottom: This is a must. If you use a standard pie dish, getting a clean slice out is nearly impossible.
- Flat bottomed glass: I use a drinking glass to press the crust firmly into the corners.
- Hand mixer or stand mixer: You can do it by hand, but whipping the cream to stiff peaks is much faster with a tool.
- Offset spatula: Great for getting that perfectly smooth, flat surface for the berries to sit on.
- Chilled mixing bowl: If your kitchen is hot, put your metal bowl in the freezer for 10 minutes before whipping the cream.
Step by step Assembly
Let's crack on. Remember to keep your cream in the fridge until the very second you need it.
- Combine almond flour, melted butter, sweetener, and salt in a bowl. Stir until the mixture resembles wet sand. Note: Don't overwork it or the butter will separate
- Press the mixture firmly into the bottom and up the sides of a 9 inch tart pan with a removable bottom using a flat bottomed glass. Press until the base is solid and pale gold.
- Beat the softened cream cheese and powdered sweetener until smooth. Mix for 3 minutes until it looks silky and glossy.
- In a separate chilled bowl, whip the heavy cream until stiff peaks form. For the best volume, follow the techniques suggested by Serious Eats regarding cream temperature. Note: Stop immediately when peaks stand straight up
- Gently fold the whipped cream into the cream cheese mixture along with the vanilla and lemon juice. Fold with a spatula until no white streaks remain.
- Spread the filling evenly into the prepared crust and smooth the top with an offset spatula.
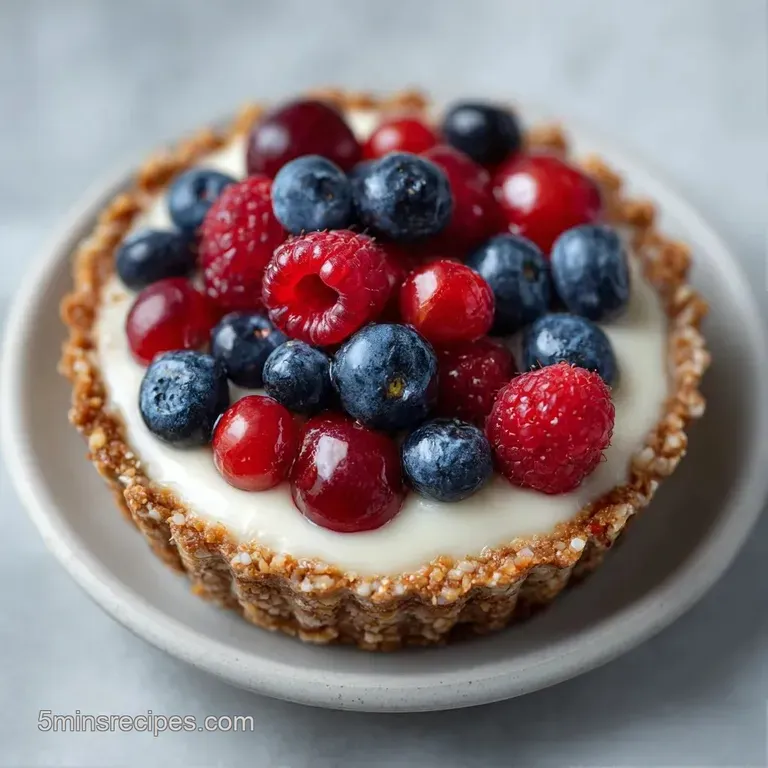
- In a tiny bowl, mix the chia seeds and water, let sit for 5 mins, then toss with your berries. Arrange blueberries in a concentrated circle in the center and ring the outer edge with sliced strawberries.
- Chill the tart in the refrigerator for 4 hours before slicing and serving. Wait until the filling feels firm to the touch.
Pro Tips and Pitfalls
I've made the mistake of rushing the "softened" cream cheese part. If you try to beat cold cream cheese, you'll get tiny little lumps that no amount of mixing will fix. Leave it on the counter for at least 2 hours.
Another thing: be careful with the monk fruit. Some brands have a cooling sensation (like mint) that can be distracting. Powdered versions usually hide this better than granulated ones.
Why Your Filling Is Runny
If the tart doesn't set, you likely over mixed the cream or used a low-fat version of cream cheese. low-fat options have more water and less stability.
| Problem | Root Cause | Solution |
|---|---|---|
| Filling is soupy | Over whipped cream or low fat | Chill for another 2 hours or use full fat |
| Crust crumbles | Not enough butter or poor pressing | Press harder with a flat glass next time |
| Berries bleeding | No chia glaze or too much juice | Pat berries dry before adding glaze |
Common Mistakes Checklist
- ✓ Checked that cream cheese is truly room temperature
- ✓ Used ice cold heavy cream for maximum lift
- ✓ Pressed the crust firmly into the sides to avoid gaps
- ✓ Used powdered sweetener to avoid grit
- ✓ Allowed the full 4 hours of chilling time
Fun Flavor Variations
If you want to shake things up, this base is incredibly versatile. If you love fruit forward treats, you might also enjoy my Homemade Peach Rings for a different kind of summer vibe.
- The Tropical Twist: Swap the strawberries for diced mango and the blueberries for kiwi. Use lime juice instead of lemon for a zesty, beachy flavor.
- The Chocolate Base: Replace 30g of almond flour with unsweetened cocoa powder. This creates a dark chocolate crust that pairs beautifully with the red berries. For something even more decadent, check out my Chocolate Covered Strawberries guide.
- The Nutty Swap: If you're not a fan of almonds, you can use hazelnut flour. It gives the crust a deeper, more toasted aroma that tastes like a fancy praline.
- The Vegan Path: Use coconut cream (chilled overnight and whipped) and vegan cream cheese. Use coconut oil instead of butter in the crust.
Adjusting Your Batch Size
Depending on how many people are coming to the party, you might need to scale this up or down.
Scaling Down (Half Batch) Use a 6 inch tart pan. Reduce the chilling time by about 1 hour since the mass is smaller. If the recipe calls for an egg (not in this one, but for future reference), beat one egg and use half by weight.
Scaling Up (Double Batch) You can make two 9 inch tarts. Don't just double the salt and spices; go to 1.5x first and taste. When whipping the cream in a large batch, be careful not to over mix, as the volume increases quickly.
| Desired Outcome | Adjustment | Result |
|---|---|---|
| Richer Base | Add 1 tbsp extra butter | More crumbly, savory crust |
| Tartest Filling | Add 1 tsp extra lemon juice | Sharper contrast to the berries |
| Extra Stability | Add 1 tbsp xanthan gum | Thicker, more "cake like" filling |
Debunking Common Myths
You'll hear a lot of conflicting advice about sugar-free baking. Let's clear some things up.
"Almond flour is a direct 1:1 swap for wheat flour." Not true. Almond flour doesn't have gluten, so it doesn't "bind" the same way. That's why we use melted butter to create a paste rather than trying to make a traditional dough.
"sugar-free desserts always taste like chemicals." Only if you use the wrong sweetener. Erythritol and monk fruit are much closer to real sugar than old school aspartame. The key is using them in combination with fats like cream cheese to mask the aftertaste.
Storage and Waste Tips
This tart keeps surprisingly well in the fridge. Cover it loosely with plastic wrap or store it in an airtight container. It'll stay fresh for about 3 days. I wouldn't recommend freezing it, as the fresh berries will turn mushy and lose their vibrant color once they thaw.
To avoid waste, don't toss the strawberry tops! Put them in a jar of water with a slice of lemon and let it sit in the fridge for a day. It makes a subtle, refreshing fruit water that's great for staying hydrated during the 4th of July heat.
If you have leftover almond flour, you can toast it in a dry pan for 2 minutes and sprinkle it over yogurt or oatmeal. Also, any leftover whipped cream can be frozen into tiny dollops for quick coffee toppers.
Best Serving Ideas
To make this sugar free 4th of July Dessert with Fresh Berries look its best, slice it with a hot knife. Dip the knife in hot water and wipe it dry between every single cut. This gives you those sharp, clean edges that make the dessert look high end.
Serve it on a white platter to make the red and blue pop. If you want a bit more indulgence, a small dollop of sugar-free whipped cream on the side adds a nice touch. Since it's a cold dessert, it pairs perfectly with a hot cup of tea or a sparkling lemonade.
For a crowd, you can pre slice the tart before bringing it to the table. This prevents the "first cut" anxiety and makes it easy for guests to grab a piece without needing a server. Just remember to keep it chilled until the very last moment!
Recipe FAQs
What is a fancy healthy dessert recipe you can recommend?
Try this sugar-free berry tart. It combines a buttery almond flour crust with a light monk fruit cream filling and fresh berries for a sophisticated, patriotic presentation.
Is there a delicious healthy dessert for the 4th of July?
Yes, this no-bake berry tart is an ideal choice. It satisfies sweet cravings using natural sweeteners and fresh fruit, keeping the celebration light and refreshing.
What are some healthy snack and dessert ideas?
Fresh berry tarts and protein rich treats are great options. If you like the quick assembly of this recipe, you can also make no bake bites for a faster snack.
Is this sugar-free 4th of July dessert with fresh berries a no-bake recipe?
Yes, it is entirely no-bake. The crust is pressed into the pan and the filling sets in the refrigerator for 4 hours, so no oven is required.
How to make an easy sugar-free 4th of July dessert with fresh berries?
Press an almond flour and butter crust into a tart pan. Fill the shell with a whipped cream cheese and monk fruit mixture, top with blueberries and strawberries, and chill for 4 hours.
Is it true that I can use frozen berries to save time?
No, this is a common misconception. Frozen berries release too much moisture and will bleed color into the filling, ruining the distinct red and blue layers.
How to prevent the filling from becoming too soft?
Chill the heavy cream until ice-cold before whipping. Ensure the finished tart remains in the refrigerator for the full 4 hours to allow the structure to stabilize.
sugar free Berry Dessert

